

We’re an affiliate: We hope you love our articles and the products we recommend! Just so you know, when you buy through links on this site, we may earn an affiliate commission. Thank you if you use our links, we really appreciate it!
In 2010 I started looking into the necessary equipment for starting a youtube channel. I wanted to know what I needed to start making videos as a YouTube beginner because one of my clients asked me to start making YouTube videos for his website.
After doing some research I came to a startling and exciting conclusion. You don’t need any expensive video gear to start making YouTube videos as a beginner. All you need is a good webcam, like the Logitech C920 HD Pro or your smartphone. In fact, many established YouTubers are using consumer-grade audio and video equipment.
That was an awesome moment. I realized the necessary YouTube equipment for beginners is not much at all and you don’t need a studio. In fact, in some cases, you don’t even need a video camera.
However, assuming you want to appear in your videos there are five things you need as a YouTuber or vlogger.
What equipment is needed to make YouTube videos as a beginner
So, what do YouTube beginners really need to start making good quality videos? It really comes down to these five things.
- HD camera for a clear and sharp image
- External microphone
- Tripod for a steady image
- Good Lighting for optimum camera performance
- Editing software to only keep the best bits
I’m not saying the equipment has to be professional or expensive. I’m not even saying you need to buy a DSLR or mirrorless camera, although you can if you want to.
The truth is, I discovered that you don’t have to spend a huge amount of money to get started on YouTube. If you’re on a tight budget, you can even start without spending much money at all. All you need is an inexpensive YouTube starter kit, some basic home video production knowledge, and the ability to improvise.
Once you put those ingredients together you will be able to publish videos that look and sound good. OK, as in any learning process your first few efforts won’t be fantastic, but your YouTube videos will be much better than anything created by the average smartphone user. They neither know what equipment you need to make YouTube videos nor how to use it.
So, let’s move on and I’ll be more specific about my YouTube setup for beginners that will enable you to start your own video production on a budget.
1. Use an HD camera for a clear and sharp image
I think you will agree, you will need a video camera, of some kind, to get started making online videos. But the question is, “what kind of camera do I need for YouTube videos?”
The answer is quite simple and may surprise you.
The cheapest option for making YouTube videos as a beginner is to use a webcam or your smartphone.
That’s right. You don’t need a super expensive DSLR or mirrorless camera straight away. You could get going with making YouTube videos with the equipment you’ve already got or by spending a modest amount of money. Let’s look at the webcam option.
A webcam is a cheap entry point YouTube camera
If you have a laptop, you almost certainly will have a built-in webcam. The only problem is that it will most probably be an HD 720p webcam. Although it’s not full HD it will be good enough to get started.
However, not everyone has a laptop, and most desktop PCs don’t come with a webcam. Don’t worry, these days full HD USB webcams are quite affordable. Good examples range in price from about $20 to around $100.
The webcam I have and would recommend to any YouTube beginner is the Logitech C920. It’s been around for a little while but is still considered to be one of the best. It can record at resolutions of up to 1920×1080 at 30 frames per second.
The recorded footage is good enough for YouTube videos or online course creation. For example, Udemy requires your course videos to be at least 720p at 30fps. So, the Logitech C920 can do that and better.
There are newer versions of the C920, such as the Logitech C922x Pro Stream Webcam. The footage from the C922x is a tiny bit sharper, and it can do HD1080p at 30fps & HD720p at 60fps and includes “background replacement technology“.
So, in theory, you can do the green screen effect without a green screen. If that is of interest, you can buy the Logitech C922x![]() on Amazon. However, most people will do perfectly well with the original Logitech C920
on Amazon. However, most people will do perfectly well with the original Logitech C920![]() , that is also available on Amazon
, that is also available on Amazon
To get started you don’t even need to install any fancy recording software. You can use the Windows 10 Camera App. To access the app, type Camera in the Cortana search bar and then click on the Camera App icon that comes up.
You might also like this…
A smartphone – the YouTube camera you already own
If you don’t have a webcam the other option for YouTube beginners is to use a smartphone.
It doesn’t have to be the most modern smartphone. For instance, my old iPhone 4 no longer contains a SIM for calling but it can still shoot perfectly decent quality HD720p footage. These days, I prefer to work with a minimum video quality of HD1080p, because the image looks better. Although, my old iPhone 4 that records HD720p would be OK to get me started on YouTube.
The advantage of using a smartphone as your camera is that you probably already have one. Therefore, you may not need to spend any extra money on buying a camera. And remember this, you don’t need the very latest smartphone to record good video footage.
Realistically most smartphones from the last few years will do an excellent job of recording video footage.
But there are a few things you can do to improve the quality of your smartphone YouTube footage.
When holding your smartphone keep it completely still. This will prevent your video clips from being shaky and keep the footage as sharp as possible. The trouble is that any handshake will introduce a little motion blur, which generally you want to prevent.
Don’t hold your smartphone the way you normally would. Turn it through 90 degrees and shoot your video as landscape. Most YouTube users hate vertical video, and although the YouTube player now supports vertical video some people may find it a turn-off.
Use the rear decent quality camera on your smartphone if you want to get the best-looking video clips possible. However, using the rear camera comes with a problem, you can’t see yourself on your phone’s display to check everything looks good. For methods to help you frame yourself, check focus and exposure read the two articles below.
This tip is more about your presentation. When someone takes your photo with a normal camera it’s natural to look at the center of the camera, because that’s usually where the lens is.
But with a smartphone, the camera lens is off to one corner or the middle of one edge. So, make sure you look at the lens and not the middle of the smartphone.
The reason you need to look at the lens is that you will then appear to be looking at the viewer. If you look at the middle of the smartphone, you’ll appear to be looking past the viewer, as if checking out something that’s behind them. That’s not going to help you establish a rapport and a connection with the viewer.
If you want to use the native camera app on your smartphone that’s OK. But you will get better results by using a more professional video camera app. FiLMiC Pro, Moment, and MAVIS are my three go-to video apps.
MAVIS is free to download but you can add extra functionality through in-app purchases. FiLMiC Pro and Moment, however, it will cost you a few dollars from the outset, but is well worth the investment. You will have access to live analytics and full manual control over your smartphone’s camera.
If you’re still worried about a smartphone being a credible YouTube camera, there’s no need to. The iPhone and many Android phones are used by journalists![]() and their reports are frequently seen on TV News and the broadcaster’s website.
and their reports are frequently seen on TV News and the broadcaster’s website.
iPhones have even been used for the “filming” of independent movies. Tangerine is an example of a movie that was exclusively shot on an iPhone (and FiLMiC Pro).
I also keep my iPhone SE in my video kitbag for client shoots. I can get the iPhone into tight spots where my Canon video camera and tripod just won’t go. I also use the cell phone to grab b-roll shots and alternative angles to my main camera.
So, as I said at the start of this paragraph, don’t be worried about having a smartphone as part of your YouTube video equipment.
2. Get a good external microphone to record good audio for YouTube videos
The perceived quality of your video isn’t just about how it looks, the quality of your sound is also important. Viewers will put up with a poor image if the sound is good. But they’ll often skip to the next video if the sound is poor.
The easiest and cheapest way to get your audio sounding good is to get an external microphone. That’s partly because internal camera mics are often inferior but also because the closer the mic is to your mouth the clearer your voice will be.
If you put a microphone, any microphone, more than a couple of feet away from your mouth, your voice will have to compete with the reverberation of your voice in the room, and any background noise.
But if your microphone is 6 to 12 inches away from your mouth, your voice will be the dominant sound and much louder than any ambient background noise. Because of that, you can turn down the mic gain and hopefully the only thing the viewer will hear is your voice and nothing else.
You have several microphone options to choose from
- Laptop microphone: If you have a laptop, not only will it probably have a built-in webcam, but it will most likely also have a built-in microphone. However, this is not an external mic. Your laptop’s mic is going to be as far away from you as the camera. If necessary, you can use it but going forward it’s not an option that will give you the best results.
- Smartphone internal mic: If you’re holding your smartphone at arms-length in front of you the phone’s internal microphone might be all you need. It may not sound great, but it will probably be OK if you are recording in a low noise environment. This is really a starter solution to recording your audio, you will want to move on to using better microphones.
- Lavalier Microphone: Inexpensive lav mics are usually connected to the camera by a long cable, giving the presenter some freedom of movement. They often come with a metal alligator clip allowing them to be attached to clothing.
Most lav mics are omnidirectional, meaning they are sensitive to sound from any direction, so the end of the mic does not have to point at the speaker’s mouth.
Lav mics normally connect using 3.5mm TRS or TRRS jacks and may or may not require battery power. More expensive wireless lavalier mics are also available but are probably better suited for when you want to upgrade from a YouTube starter kit to a higher quality video kitbag.
- USB Microphone: These are easy to set up with your computer since most are plug n play devices. I would recommend getting a USB mic if you intend to record at your PC with a webcam or when doing screen capture-type videos. They are also good for recording a voice-over to put behind b-roll footage or graphics in a tutorial or Video Sales Letter.
- XLR Microphone: Use an XLR mic for the same sort of purposes as a USB mic. The XLR part of the name refers to the XLR connector on the mic, which is usually only found on professional microphones, both dynamic and condenser types. You’ll need an XLR to USB audio interface, such as the Focusrite Scarlet 2i2
 available on Amazon. The 2i2 audio interface is now into its third-generation update and still proves to be extremely popular for home music recording and remote voice-over artists.
- Shotgun Microphone: These are very directional microphones, most often used outdoors. However, they can successfully be used to record voice-overs and YouTube vlogs.
Ignoring the more pro-grade types, the ones you are most likely to use are the so-called on-camera shotgun mics. These include the Rode VideoMicro![]() , Rode Video Mic Pro+
, Rode Video Mic Pro+![]() , and my favorite (for both quality and price) is the Deity V-Mic D3
, and my favorite (for both quality and price) is the Deity V-Mic D3![]() .
.


Last update on 2025-10-20 / Affiliate links / Images from Amazon Product Advertising API
Unless you are shooting run and gun type footage on a DSLR or Mirrorless camera I would take your on-camera shotgun mic off the camera and mount it close to your speaker but just out of shot above the top of the frame. Your recorded sound quality will always be better the closer the mic is to your presenter or speaker.
Recommended Mic when recording with a smartphone
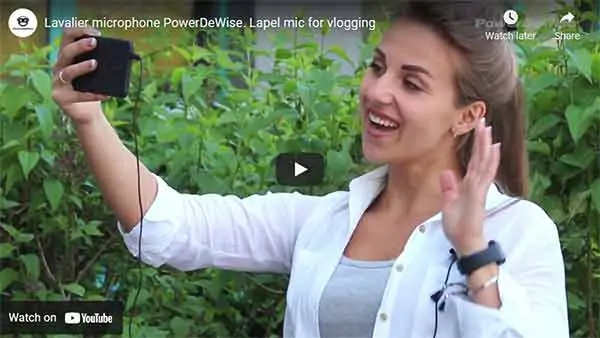
The PowerDeWise professional-grade lavalier/lapel microphone is a wired omnidirectional microphone that, while inexpensive, provides excellent audio performance. Check out this video to hear what it sounds like and to learn more about the mic.
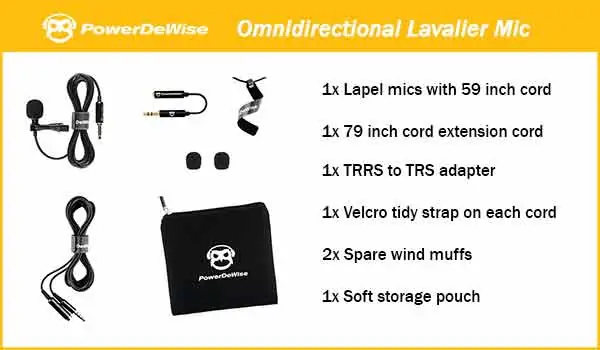
The PowerDeWise lav mic comes with a 59-inch cord, which is going to be long enough in most shots. However, if you want to get further from your camera the mic comes with a hand 79-inch extension cord. Both cords have a small Velcro cable tidy. The extension cord and the Velcro cord tidy are nice touches since I have used other wired lave mics with 18ft cables that always end up a tangled mess.
The PowerDeWise is designed to work with Android and Apple devices, as well as Windows PCs and cameras. It’s fitted with a 3.5mm TRRS jack, however, a TRRS to TRS adapter is included for devices that require a standard TRS connector.
The Power DeWise technical specs include:
- Sensitivity: -46±2dB
- Pattern: Omnidirectional
- Operating Voltage: DC1.0V – 10V
- Current: <0.5mA
- Signal to Noise Ratio: ≥56dB
- Frequency Range: 50Hz -16kHz

- 100% WIRED. Always ready to use. Stable communication without radio interference in any place. Never...
- UPGRADED 2022. Professional Grade Lavalier Microphone has new fully shielded cord that makes your...
- UNIVERSAL COMPATIBILITY. For Android, GoPro, Cameras, Camcorders, Audio Recorders, Tablets, Laptops...
- EXTRA-LONG CORD WITH EXTENSION CORD. Our clip-on microphone has 79" (2m) length cord and additional...
Last update on 2025-10-20 / Affiliate links / Images from Amazon Product Advertising API
READ MORE: See my article and mic test![]() where the PowerDeWise lav mic came top in my test of three inexpensive lavalier mics, beating two established and respected names in professional audio.
where the PowerDeWise lav mic came top in my test of three inexpensive lavalier mics, beating two established and respected names in professional audio.
Recommended microphone when recording with a webcam
Although you can use the Power DeWise lav mic with a desktop or laptop computer you may find setting it up a little tricky. It’s not just the Power DeWise mic, I’ve had the same issue with other makes of external lavalier microphones.
In theory, all you need to do is plug the microphone into one of the computer’s mic sockets and then set it as your default microphone input in the audio settings.
When using the mic socket on the front of my desktop or the side of my laptop, the setup has been a bit time-consuming. However, using the pink mic socket on the rear of my desktop worked out well. You can see the type of sockets I mean in the images below.
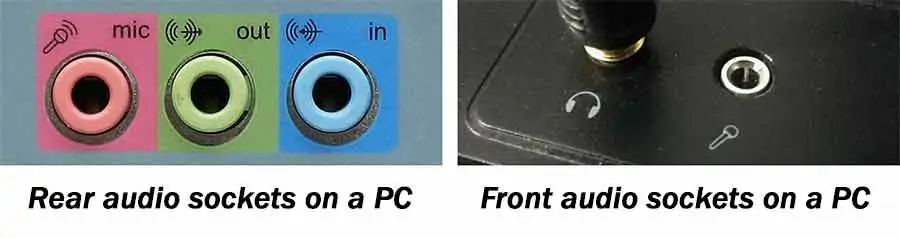
If it works on your computer that’s great, go ahead and use the Power DeWise lav mic. It’s cheap and sounds good.
However, when it comes to recording with a webcam or voiceovers at your PC, I would always recommend a plug & play USB microphone, especially if you are not technically minded.
A USB mic is not going to be as discrete as a lavalier microphone. However, you might not worry about having a microphone seen in the shot. YouTube vloggers frequently have large condenser microphones visible in the shot, either on a tabletop mic stand, an adjustable boom arm, or a suspended cord type mount. However, I often feel it’s a case of them building up their credibility by having a serious piece of studio equipment on display.
Two very affordable desktop USB microphones are the NASUM USB microphone and the Fifine K669B Condenser USB microphone. If you want to jump to a higher quality USB microphone you might wish to go for a Blue Yeti.
At the lower end of the price range, I found the NASUM USB Microphone![]() on Amazon.
on Amazon.
I have bought the NASUM USB mic and the Blue Yeti. The cheaper mic I use when directing professional voiceover artists during remote recording sessions, but because the sound quality is much better than I expected, I have used it to record my voice for screen capture “How-To” videos. The Blue Yeti is mounted on a boom arm support in my voice booth and used to record better quality voiceovers.
The Blue Yeti is a microphone you could invest in right at the start of your YouTube career and still be using it when you upgrade your camera and lights.

Last update on 2026-03-13 / Affiliate links / Images from Amazon Product Advertising API
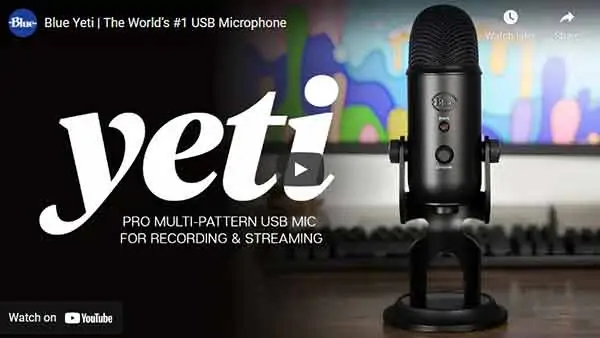
My recommendation is the Blue Yeti![]() , it’s the number 1 premium USB microphone.
, it’s the number 1 premium USB microphone.
The Blue Yeti is a Plug’n’Play mic, so it just works on any PC or Mac, without the need for special drivers. Just calibrate it with your operating system and you’re ready to start recording or streaming.
The Blue Yeti has a three-capsule array making it possible to select different polar pickup patterns (cardioid, omnidirectional, bidirectional, and stereo). Cardioid will probably be your preferred choice since it will allow you to preferentially record your voice rather than ambient noise to the side and rear of the microphone.
The base of the microphone has a USB socket and a 3.5mm headphone socket. The body has audio controls for headphone volume, pattern selection, mute, and microphone gain. Using the controls allows you to easily balance your voice against any background sounds playing on your PC or Mac.
Although you can buy USB microphones that are cheaper than the Blue Yeti, you can keep on using this mic as you upgrade your other YouTube studio equipment.
The Yeti is a side-address microphone. Meaning you speak from the side of the mic and not into the end. Speak from the same side as the Blue logo.
Compared to the Power DeWise Lav Mic and the NASUM USB mic the Blue Yeti is a bit of a heavyweight. The mic comes in at 1.2 lbs (.55 kg) and the stand is another 2.2 lbs (1 kg). It also has a better frequency response of 20Hz – 20kHz.
The Blue Yeti technical specs include:
- Capsules: 3x 14mm condenser capsules
- Polar Patterns: Cardioid, Bidirectional, Omnidirectional, Stereo
- Operating voltage: 5V
- Current: 150mA
- Frequency Response: 20Hz – 20kHz
- Sample Rate: 48 kHz
- Max SPL: 120dB (THD: 0.5% 1kHz)
- Gain control
- Mute button
- Zero-latency headphone output
- Windows 7, 8.1, or 10 (USB 1.1/2.0/3.0)
- macOS 10.10 or higher (USB 1.1/2.0/3.0)
For more information on the microphone download the Yeti manual from this Blue Microphone![]() web page.
web page.
Now that we have made sure you can record good video and sound, we need to make sure your image is the best it can be by avoiding camera shake.
3. Use a tripod for steady shots and get the camera height right
Shaky footage makes video difficult to watch, and on YouTube, viewers can easily click away to find something better. So, if you want to keep your viewers watching you must make your shots are rock steady.
Fortunately, it’s easy to achieve. Both the Logitech C920 webcam and a smartphone can be mounted on a tripod to eliminate any camera movement or shake.
The C920 webcam comes with a handy threaded 1/4″ tripod mounting hole on the base of its universal mount. Just screw it onto your tripod and you’re good to go.
But there’s another reason you need a tripod. Whether you are using a smartphone or a webcam a tripod will allow you to get the height and angle of your camera right. Your camera lens should be at or slightly below your eye level. It should also be level and not pointing up or down.
Essentially, a tripod allows you to appear to be at the same height as the person who’s watching your video. Think about chatting to people you meet at a party or networking event. You feel most comfortable when you and the person you are speaking to are approximately the same height. If the other person appears to be looking down at you it produces an uncomfortable feeling.
I explain getting the height and angle right when using a webcam in the following article. The same principle applied when using any other camera, such as a smartphone.
Stability Tips
If you find yourself recording with your smartphone and don’t have your tripod with you use these tips. Use both hands to hold your phone in landscape mode, this will help reduce any shake. Increase the stability of your grip by pulling in your elbows against your sides.
Alternatively, rest your elbows on a desk or table. Finally, is you’re using FiLMiC Pro and a phone with lens stabilization, go into your FiLMiC Pro setting and turn on Stabilize.
Recommended tripod for webcam and smartphone
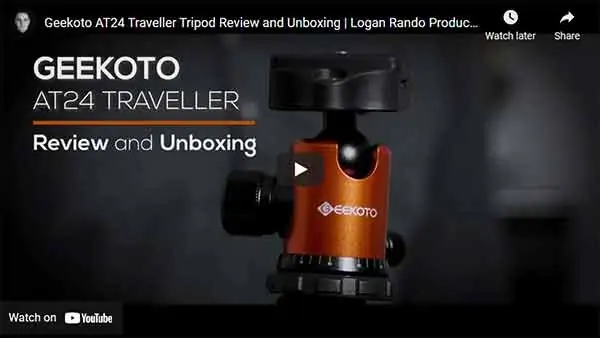
The tripod I really like is the GEEKOTO AT24 Traveller![]() available on Amazon. It’s a 58” Ultra-Compact Lightweight Aluminum Tripod that’s very versatile. The way the legs are designed you can use it as a traditional tripod or flip the legs up to invert the tripod so you can get your camera close to the ground.
available on Amazon. It’s a 58” Ultra-Compact Lightweight Aluminum Tripod that’s very versatile. The way the legs are designed you can use it as a traditional tripod or flip the legs up to invert the tripod so you can get your camera close to the ground.
Another splendid feature is you can detach one of the legs and use it with the ball head as a monopod.
So, if you want a tripod that you can use as you grow with your YouTube video making the GEEKOTO AT24 Traveller could be an excellent choice.
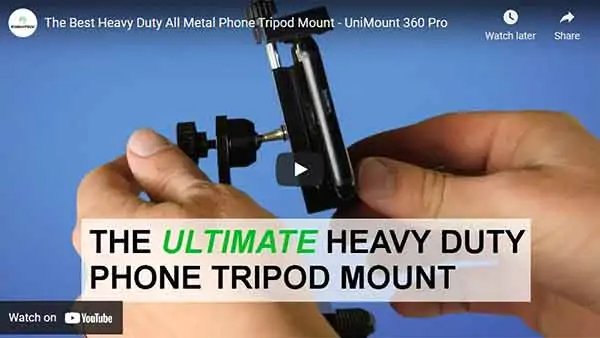
For your smartphone, you’ll also need a tripod adapter. There are many cheap plastic mounts available but one of the bestselling models is the KobraTech Cell Phone Tripod Mount. Bust for an extra $10 KobraTech also has a Pro Heavy Duty tripod mount![]() . It’s made of industrial-grade solid metal and has both 1/4″ and 3/8″ threaded holes on the base plate so it will attach to any tripod.
. It’s made of industrial-grade solid metal and has both 1/4″ and 3/8″ threaded holes on the base plate so it will attach to any tripod.

Two accessories are also included. An Arca-Swiss quick release base for faster mounting and releasing, plus a Bluetooth shutter remote for iPhones. For a closer look watch this video from KobraTech.
4. You need good lighting for YouTube videos
You’ll have noticed that my list of essential equipment in answer to the question, “what equipment do you need to be a YouTuber”, included “Lighting”. However, I was careful not to say “Lights”.
Artificial lights, whether professional studio-grade or just desk lamps are not essential.
The early moviemakers of the twentieth century did very nicely with just daylight, and to begin with, so can you. Of course, video lights would enable you to record videos at any time of day or night.
Why you need good lighting
Lighting is an essential element of video production. To show an image you will need light and generally, you’re better off with more light than less light.
As an example of that try taking two outdoor selfies on your smartphone. One when it’s bright outdoors and one at dusk.
In the sunny day image, you’ll see that the colors look more vibrant, and if you zoom in a little, you’ll see a good amount of detail.
But in the image taken at dusk, you’ll notice a few differences.
The colors will look less vibrant, even a little muddy. When you zoom in a lot of the detail will be lost because the image looks grainy due to video noise.
The reason for all that noise is that your smartphone’s camera performs better in brighter conditions. With less light, the camera tries to compensate by electronically brightening the image, but that will make the noise in the image more noticeable. However, if the lighting is good the camera can perform at an optimum level and your video footage will look clean and good.
So, for good video you need good lighting. But that doesn’t have to be from artificial lights. Daylight can be fine.
How to use daylight for YouTube videos
Daylight is cheap and plentiful, although the time of year and your location will affect how much daylight you have available for video making.
More importantly, even on overcast days daylight will be brighter than typical domestic lights. In fact, if you measure the light level from many amateur or prosumer video lights available from online retailers it will be lower than sunlight.
If you have a broad window, especially north-facing, you will have plenty of soft light to work with. South-facing windows are a little trickier since you do not want direct sunlight flooding in. Wait for the sun to pass by, at that point your whole window will effectively be a large single light source.
This kind of soft light is flattering since shadows are smoothed out, which helps to conceal skin imperfections.
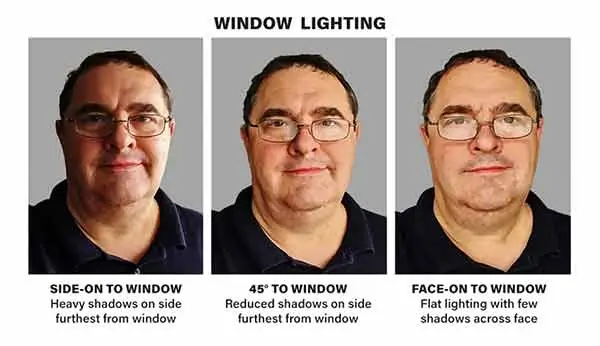
Daylight can also provide a variety of lighting styles.
By changing the angle that you face on to the window you can drastically alter the shadow on your face. Going from no shadow when face-on to the window to pronounced shadows when side-on to the window.
If you like the side-on look but want to fill some of those shadows, it’s easy to set up a reflector on the opposite side to bounce some daylight back into the shadows.
The main drawback of using natural lighting is that it’s not as reliable or as consistent as artificial lighting. Clouds may cover and uncover the sun, changing the brightness and quality of the light.
You may have to wait until a certain point in the day when you won’t have direct sunlight producing hard shadows. Also, if you film over a few days the lighting may change from clip to clip, the change becoming obvious when you come to edit the clips together.
Using artificial lights for YouTube videos
Artificial lighting gives you more consistency and control over your video production. For that reason, you might want to add some to your shopping list of video production gear.
With lights, you can make YouTube videos at any time of day or night.
They also allow you to record sections of your video at separate times and edit them together seamlessly. While the “quality” of daylight varies throughout the day, artificial light will be the same every time you setup. So, provided you wear the same clothes, everything should look the same.
Simple YouTube lighting setup
The simplest lighting setup for your vlog videos is to use your normal room lights combined with a single desk lamp. The room lights will help with the general illumination of the room and background, but you can make your face “pop” against the background by placing an adjustable desk lamp behind and a little above your webcam or smartphone.
The desk lamp is only meant to create a little separation between you and the background, as well as fill any unattractive shadows, so don’t use too powerful a bulb. With too much light on your face, you will end up looking completely washed out. When you try to correctly expose for your over-bright face you will end up making your background too dark.
Why you should use a softbox lighting kit for your YouTube video lighting
A bare bulb is a hard light source, meaning that it will cast sharp or hard shadows. On the other hand, a soft light source will tend to cast shadows with soft edges. It’s as if they produce a gradual transition from light to dark.
This talk about hard and soft light matters because a subject lit with soft light will appear more attractive. Soft light has a magical property of helping to smooth out shadows, including those caused by facial lines and wrinkles. That’s one reason portrait photographers like working with soft light, it allows them to flatter their subject.
Soft light can be produced by making the lightbulb appear to be as large as possible. That can be done by placing one or two large light diffusers in front of the bulb. The diffuser is usually thin white nylon material. Once lit by the bulb, the whole surface of the diffuser becomes the light source.
Light from different parts of the diffuser surface will overlap on the subject, so where light from one side may cause a shadow, light from the other side of the diffuser will partly fill in the shadow. Hence, we get that flattering soft light effect.
Light manufacturers use this principle to create several types of video lighting, including softboxes. It’s this type of light I would recommend when making videos in your home video studio.
My recommended YouTube lighting kit
Professional lighting can be expensive, but you would do well to avoid those pricey pieces of hardware. You will find plenty of affordable light kits online. Depending on what you are after you can spend anywhere between about $50 to around $250. When I started, I got a two softbox light set. I’ve since found almost the same light kit on Amazon for less than I paid for my original lights.
My starter YouTube lighting kit is affordable, performs well, and will remain useful when you upgrade from your YouTube beginner’s equipment. It’s the Studio FX 1600W softbox lighting kit![]() . It provides the right balance between price, the amount of light produced, and ease of use.
. It provides the right balance between price, the amount of light produced, and ease of use.

Each corner of the softbox hood is stretched open using a steel tension rod. Fitting these rods adds a little time during set up but they make the kit cheaper than auto pop-up softboxes such as the Linco Softboxes![]() .
.
The CFL light bulbs are daylight balanced, so you don’t have to worry if you have windows letting in light. Each light bank takes 4 CFL bulbs and with two power switches on the back of the light bank, you can run the softbox at full or half power, depending on your required brightness.
Considering how inexpensive these lights are, the softboxes have double diffusers to soften the light. There’s one inside the softbox hood, just in front of the bulbs, and a second that stretches across the front of the softbox. This means you won’t get light “hot spots” on the front diffuser.
What are the best light bulbs for video recording?
This is an awkward question to answer since it could all too easily become quite technical. However, I’ll try and keep it as simple as I can.
In a sense, the best light bulbs for video recording are traditional tungsten bulbs. That’s because, by definition, they emit a continuous spectrum of visible light, giving what we would regard as a true color rendering of skin tones and other objects in the scene. However, for YouTube Creators tungsten bulbs are unsuitable since they produce far more heat than light.
Instead, use either spiral Compact Fluorescent Lamps (CFL) or, preferably, LEDs. LEDs are very efficient and produce little heat.
The other factor to consider is the Color Rendering Index (CRI) and the Color Temperature of the bulbs. Lights with a high CRI value are best but more expensive. So, 85+ is OK, 90+ is good, 95+ is better, 97+ is great. The higher the number the more natural your skin tones.
Finally, you need to remember that not all light bulbs have the same color temperature. Some have a color temperature of 3200K, a warm or orange light. While others have a color temperature of around 5500K or approximately cool bluish daylight.
Provided you don’t mix bulbs of different color temperatures you won’t have any problems with color casts. The Automatic White Balance (AWB) on your camera will sense the color temperature and adjust the image so the colors appear natural to the eye.
Which color temperature bulbs should you buy?
If you don’t have any daylight coming in through your windows it doesn’t matter which color temperature bulbs you buy. But if you have any windows or might be recording where there will be some natural daylight you should choose daylight-rated bulbs. That way you won’t experience any strange color effects.
Lighting summary
- Use natural daylight since it’s free and can look great.
- Combine room lights with a low-power desk lamp set up behind and slightly about your camera.
- Purchase a pair of softboxes with daylight-rated bulbs. With your camera facing the subject place the lights about 45 degrees off to each side of the camera.
- 3-point lighting is like the two softbox setup plus a third light above and behind the subject to help separate them from the background.
- Don’t mix bulbs of different color temperatures.
- Buy daylight-rated LEDs or CFL bulbs so that they match any daylight entering your studio space.
5. Video editing software
Why do you edit YouTube vlog videos?
The reason you edit your YouTube videos is to make them more watchable. If you can manage to record your video in one take, then you might not need to do any editing. But if you must do multiple takes of some parts of your script, you don’t want your viewer watching all your mistakes.
On the other hand, if you have recorded an interview with a guest maybe you only want to use the most interesting parts. Again, that’s where you would use editing.
There are of course more reasons to edit your material but if all you are doing is creating YouTube videos or online video courses, you’re mainly dealing with simple editing techniques.
Depending on how sophisticated you want your videos to look, editing and editing software is maybe pretty much optional.
If all you want to do is trim the start and end of your clip, then that’s easily done. If you’re using a smartphone, you can trim your “in” and “out” points on your phone. If you’re recording with a webcam, you can use the Video Editor app that comes with Windows 10 or iMovie on a Mac.
Should you need to take your video editing further, say to cut out any outtakes, you can still use the Video Editor app or iMovie on your PC or Mac respectively.
If your phone is an iPhone download the free iMovie for iOS. You can do some awesome editing using iMovie on your iPhone or iPad, and even add voiceovers, music, and text overlays.
If you want even more sophistication in your video editing, I recommend using HitFilm Express from FXHome.
HitFilm Express is a free video editing app that puts professional-grade video tools at your fingertips. It combines a video editor with VFX tools. If you are familiar with Adobe’s creative tools, it’s a bit like Premiere Pro combined with After Effects.
Don’t worry if you are a Mac user. HitFilm Express runs on both Windows and Mac. The OS requirements are below.
- Apple: macOS 10.15 Catalina, macOS 10.14 Mojave, or 10.13 High Sierra
- Windows: Microsoft Windows 10 (64-bit), Microsoft Windows 8 (64-bit)
Although HitFilm Express is free you can upgrade to the full product or just access specific tools through in-app purchases. However, don’t think that HitFilm Express is some neutered version of the full Pro package. You should be able to do almost everything you need in this free app. If you want, you can even use it to do a green screen project.
As FXHome says on its website, HitFilm Express is…
Perfect for beginners, film students, gamers, YouTubers, or any creative without a budget.
FX Home
Use this button to download the app from the FX Home website.
Optional Extra – Backgrounds for your videos
When you’re starting with making videos I would stick to filming in front of existing backgrounds in your home or office. But there are a few things to consider.
- Tidy up a little. Make sure the background doesn’t look a mess.
- Unless you want to have a plain background try to decorate your set with a few things. Don’t overdo it though, you should be the focus of attention.
- You can add a little background color or interesting illumination with a flexible reel of LEDs.
- If you are using daylight rated main lights you can add a little yellow/orange glow to part of the background by including a tabletop lamp with a warm-white bulb against the background wall.
However, you may decide to use a plain backdrop as your background. This is optional but a plain black or white background would focus attention on you. That would be ideal if you are creating teaching videos or delivering a tutorial. If you are starting a gaming YouTube channel you may want a green backdrop. By pulling the key you can then superimpose yourself over the game footage without taking up too much space on the screen.
Optional background equipment
Background support: If you’re going to use a background it’ll usually be a muslin cloth, a collapsible background, or paper roll. Whichever you use it will need some support to keep it flat and in place. The easiest way is to pin or tape it to the wall. Understandably, your partner may not be keen on you damaging the wall, so you can either make or buy background supports. These consist of two side-stands with a crossbar between them. You then hang the background cloth of collapsible backdrop from the crossbar and use clips or clamps to pull and flatten the cloth out towards the side-stands.
Muslin background cloths: These come in a variety of sizes and are available in white, black, blue, and green. If you want a true white background or intended to do chromakey work, you should ideally use separate lighting for your background and subject.
Collapsible cloth backgrounds: These are quicker and easier to set up than muslin background cloths. They consist of an oval steel hoop covered in the background material, often different on each side. They can be collapsed down into a smaller circular shape and stored in a small circular pouch. When you take them out of the storage pouch, they will pop open easily. But there is a certain technique to folding down the larger backdrops. They come in an assortment of colors and even printed patterns.
Paper roll background: Paper roll avoids the wrinkles you’ll get in a muslin cloth background. If the paper gets dirty you tear it off and pull down a fresh section. The paper is available in a range of colors and the holder is usually fixed permanently to the wall.
Related FAQs
What equipment do I need to make a YouTube video?
To set up your YouTube channel you will need the following.
HD camera for a clear and sharp image
External microphone
Tripod for a steady image
Good Lighting for optimum camera performance
Editing software to only keep the best bits
What editing software do YouTubers use?
There is no single piece of software used by all vloggers on YouTube, but the following list includes popular apps for video editing.
iMovie
Final Cut for mac
Adobe Premiere Pro for Mac and Windows
HitFilm Express for Mac and Windows
Vegas Pro
Wondershare Filmora
Windows 10 Video Editor
How do you get paid by YouTube?
You need to meet the eligibility and threshold requirements to join the YouTube Partner Program (YPP), have your account approved for YPP membership, then sign the YPP term and sign-up for an AdSense account.
To be eligible for the YPP your channel must be in Good Standing and comply with YouTubes Community Guidelines and policies. You also need to have 4,000 public watch hours in the last 12 months and have a minimum of 1,000 subscribers.
You can check your progress in the Monetization tab in YouTube Studio and if you wish, you can be notified by email once you are eligible to apply. Once your YPP membership has been approved you will have the option to monetize your videos with Ads and earn from having YouTube Premium Subscribers watch your content.
You will also be able to earn money from channel memberships and Super Chat in live streaming. The amount you earn per 1,000 views will depend on the type of audience you attract. Advertisers will pay more to have their ads shown before videos about affiliate marketing or business-related topics rather than before general entertainment videos or videos made by teenage vloggers for a teenage audience.
You will be paid when your earnings reach your local market threshold, if you are in the United States that is $100.
What are the requirements to get paid on YouTube?
You must be an adult, i.e. 18 years old or more.
Your channel must be in good standing, comply with YouTubes Community Guidelines, and have been accepted as a member of the YouTube Partner Program. You need to sign-up for an AdSense account and associate it with your YouTube Channel. Note that not all types of content will be monetized and your ability to earn significant amounts of revenue will depend on your channel’s audience.
Do YouTubers get paid if you skip ads?
Skippable video ads are the ones a viewer can skip after five seconds. Most YouTubers know that they will not get paid if the viewer skips the video ad after the minimum view of 5sec. However, you will also not be paid if the viewer watches the ad but skips just before 30sec is up, assuming the ad is longer than 30sec. You will only get paid if a viewer watches the whole ad if it is less than 30sec, or at least 30 seconds if the ad is longer than 30sec.
The other type of ads viewers will see are Overlay ads that appear at the bottom of the video. You will only get paid for an overlay ad if the viewer clicks on the ad to expand it.
Tosh Lubek runs an audio and video production business in the UK and has been using the Canon EOS R since it was released in the Autumn of 2018. He has used the camera to shoot TV commercials for Sky TV, promotional business videos, videos of events and functions, and YouTube creator content. He has also won international awards for his advertising and promotional work. You can meet by visiting his “video booth” at HashTag business events across the country.
Recent Posts
Most people use sandbags the wrong way. Here’s how to hang them properly on a light stand for maximum stability and safety — plus what to fill them with.
You're Using the Canon RF 50mm f/1.8 WRONG! Here’s How to Fix It
If you’ve recently picked up the Canon RF 50mm f/1.8 STM—affectionately known as the Nifty Fifty—you might be confused by that strange switch on the side of the lens. It doesn’t say AF/MF...
