
DIY Video Studio is supported by its readers who use the affiliate links or ads on this site. As an Amazon Associate, I earn from qualifying purchases. Thank your support if you use any of the links.
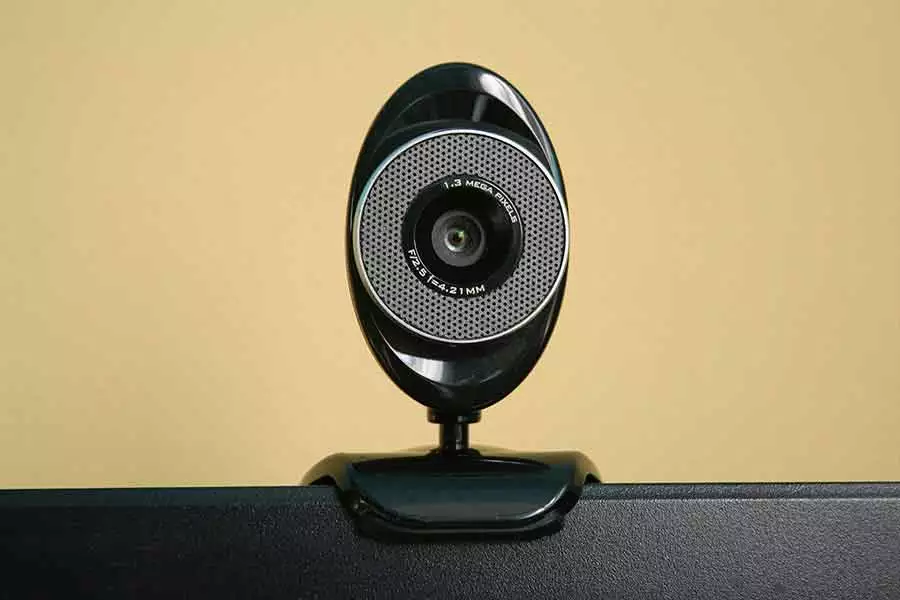
You don’t need to get an expensive DSLR or Mirrorless camera to start recording videos on your Windows 10 computer. In fact, all you need to get started is a webcam.
The easiest way to use a webcam to record video on Windows 10 is to use the CAMERA app that comes with Windows. Although the Camera app is simple, it provides enough control over focus, exposure, and video quality. If you add an external microphone, you will have a setup that’s good enough to record YouTube videos and video courses.

I’m going to assume you already have your webcam set up on your computer. So, let’s jump straight in and I’ll explain the basics of how to use a webcam on Windows 10.
First, make sure the webcam and Microphone are enabled.
- Click on the Windows Start button and then click the Settings gear wheel. When the Settings window opens click on Privacy.
- Under App Permissions click on Camera.
- Then under Allow apps to access your camera toggle the button to On.
- From the list of Microsoft Store apps make sure that the Camera is set to On.
We also want to be able to access the microphone, either your built-in or a USB mic. So, with the Settings window still, open click on Microphone under App Permissions.
Then under Allow apps to access your microphone toggle the button to On, and from the list of apps make sure the Microphone is toggled to On.
Second, open the Windows Camera App
Click on the Windows Start button, scroll down to Camera in the list of apps and click on it. Alternatively, type “Camera” in the Cortana search bar and click on the displayed Camera icon.
When the Camera app opens, choose between taking photos or videos. To record a video, click on the video camera icon.
You can go ahead and record a video by clicking on the circular video camera button. When recording it will change to a circle with a red square in the middle. Press the button again to stop recording.
But let’s look at the things you can do.
Taking control of the Windows 10 Camera app
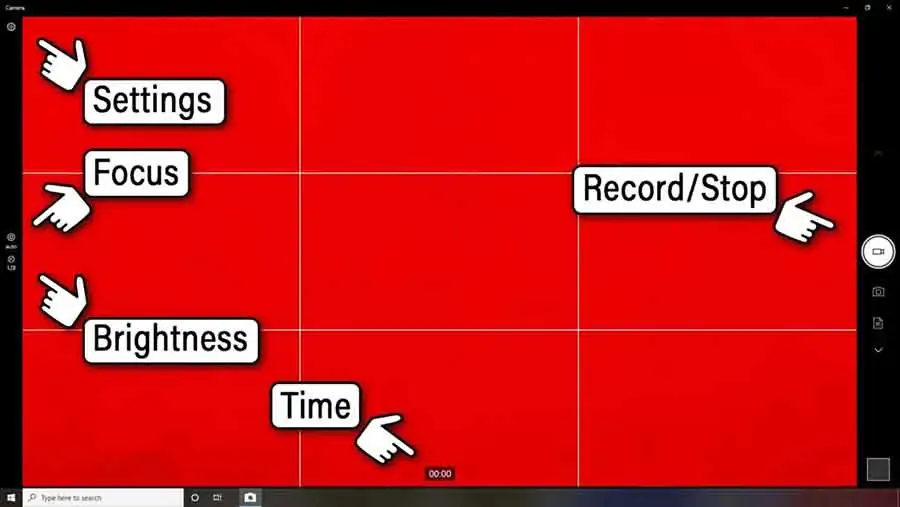
From the standard Camera interface, there are basically three things you can do.
- Start/Stop a video recording (or take a picture)
- Adjust the Camera’s settings
- Review your last video
How to Start/Stop your video recording
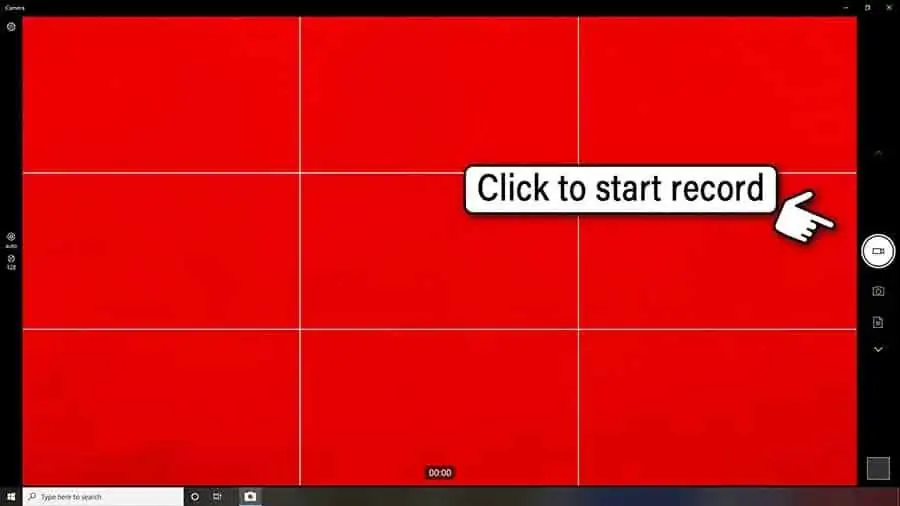
When you click on the video camera record button your recording starts immediately and the time counter begins to count.
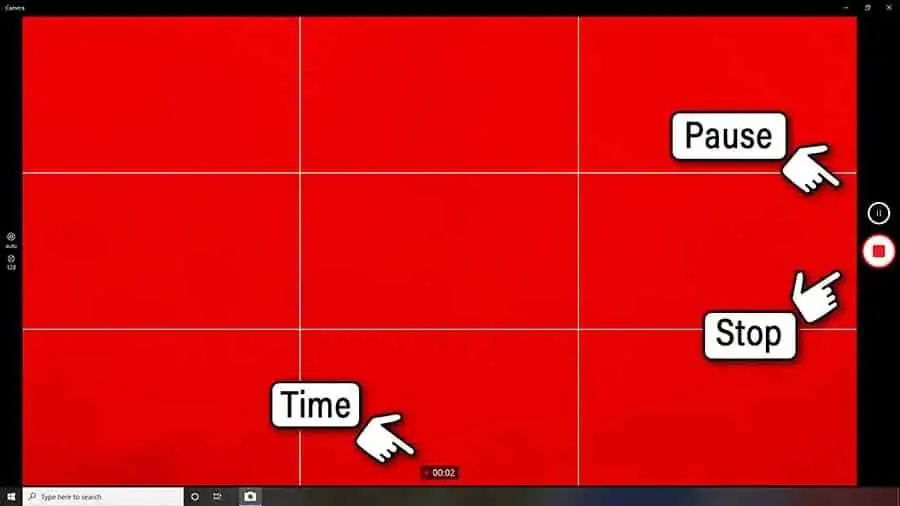
You can pause your recording at any time by clicking on the pause button. To resume your recording click the pause button again. This can be handy if you want to record your video in short sections without having to edit the separate clips together.
When you are ready to stop your recording click the red square in the circular record button.
Top Tip: Don’t stop recording immediately after you’ve stopped speaking. Editing will be easier if you leave about 1 sec of silence and you looking at the camera at the start and end of each clip.
Review your last recording
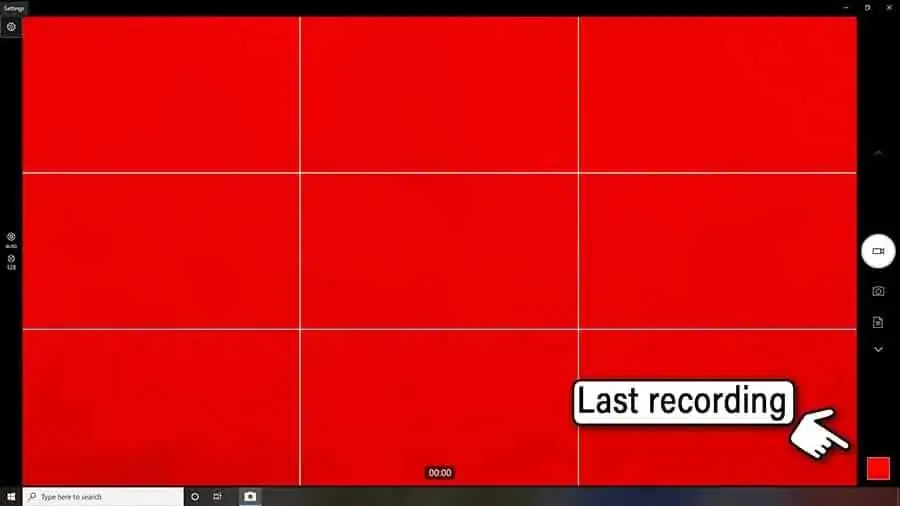
Once you have stopped recording, a square thumbnail will appear in the bottom right corner of the screen.
Click on the thumbnail to watch your recording. When you have finished watching you can return to the Camera interface by clicking the back arrow in the top left corner of the video player.
Adjust the Camera’s Settings
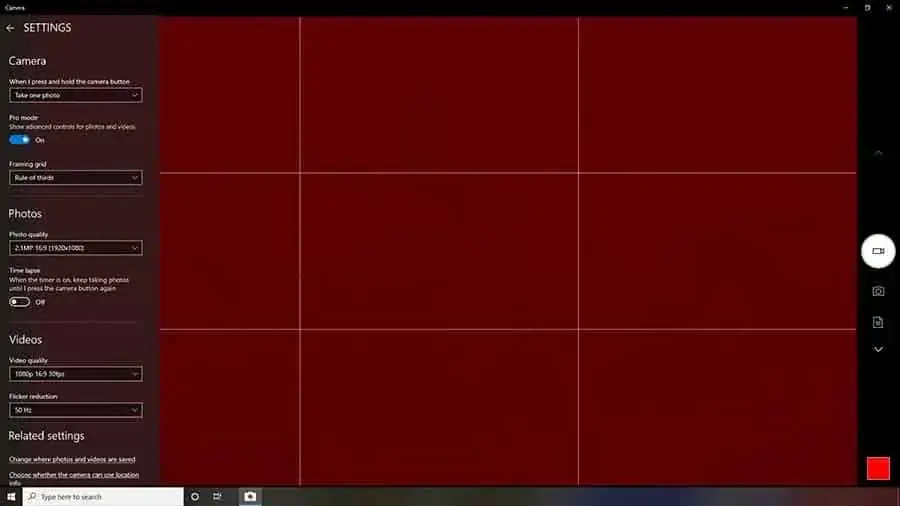
By opening the Camera’s Settings sidebar, you can adjust some camera settings and enable a couple of additional controls in the normal interface.
Click the setting gear wheel in the top left corner to open the settings sidebar.
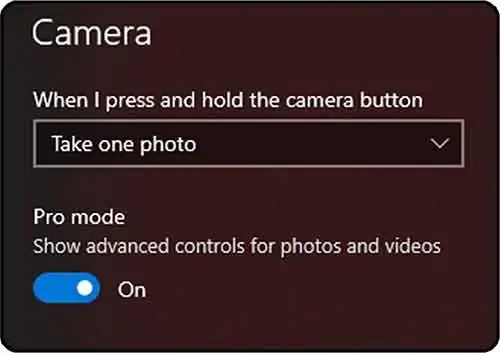
The second item is Pro mode. Make sure this is On. Pro mode enables advanced controls in the user interface for Brightness and Focus.
Framing Grid
Below Pro mode you will see Framing Grid. This adds framing guidelines to the video monitor that will help you “frame” yourself. The framing grid can be set to Off, Rule of Thirds, Golden Ratio, Crosshairs, or Square.
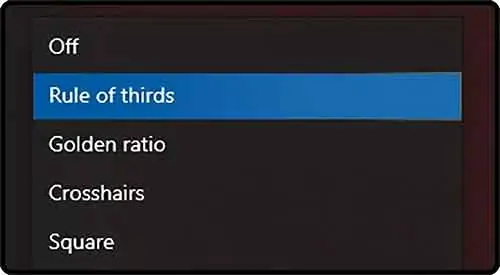
I would advise choosing Rule of Thirds since you will probably have seen this on your smartphone or camera.
The basic idea is to have your face or eyes on the uppermost horizontal line while leaving a gap between the top of the frame and your head.
Video Quality
In the bottom third of the settings sidebar, you will see Video Quality. This is where you can choose one of the resolutions your webcam is capable of.

Generally, choose the highest quality you have available. In my case, I’m using a Logitech C920 that can record HD 1920×180 at 30 frames per second. So, I would choose a quality setting of 1080p 16:9 30fps.
Choose where your videos will be saved
The last thing to do in the settings is to choose where your clips will be saved. Under Related Settings, you will see Change where photos and videos will be saved. Click on this link and you can choose the drive where your latest photos and videos will be saved.
Once you have done this close the settings sidebar by clicking on the back arrow in the top left corner.
Adjusting the webcam’s focus
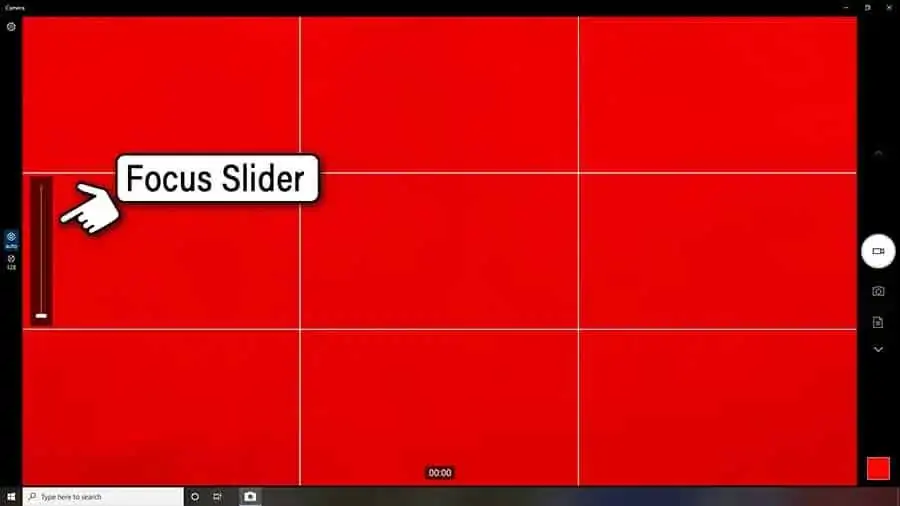
When you enable Pro mode in the settings you made the auto/manual focus button and brightness button appear on the left-hand side of the Camera interface.
The upper button is for auto/manual focus. It’s in autofocus by default but if you click on the button a focus slider will appear on the screen. Left at the bottom will keep the focus on auto, but if you slide it upward the focus will go from close-up to infinity when right at the top.
Unless you experience your webcam hunting for the correct focus you may prefer to keep the focus on auto.
Adjusting the exposure
The second button on the left gives you control over the exposure, or brightness of the image. Click on the button to reveal the brightness slider. Move it up to increase the brightness and move it down to decrease the brightness.
However, the brightness slider cannot make a poorly lit scene look good. If the lighting is too dim, raising the brightness will make video noise more noticeable. Another effect of raising the brightness will be to make the image seem desaturated.
How do I zoom using the Camera App in Windows 10
I’ve been asked this question many times and the answer, sadly, is you can’t. Even if the recording software for your webcam can do it, it’s not possible in Windows Camera.
For example, when using the Logitech C920 with the basic Logitech webcam software you can zoom, plus pan and tilt. None of that is available in Windows 10 Camera. However, don’t let that put you off the app. If you want to start recording quickly, with minimal setup, Camera will do very nicely indeed.
How can I improve the sound quality of a recorded video?
Although sound doesn’t have anything to do with how you look on your webcam, it is an important part of the viewer experience. You should try and keep your sound quality as high as possible.
Don’t believe all the sales hype about your webcam’s internal microphone. It just isn’t going to sound as good as you hoped. Even if it has good built-in mic capsules it will still sound poor, purely because it’s going to be too far away from you.
You will get a much cleaner sound that focuses on your voice by using an external USB microphone. There are plenty to choose from, such as Audio Technica’s hand-held ATR2100, used by YouTubers like Doug Cunnington of Niche Site Project![]() , or the ubiquitous Blue Yeti
, or the ubiquitous Blue Yeti
Installing the USB mic should be quite easy since it’s likely to be a plug-n-play device and your computer will automatically set it up.

The Blue Yeti, is a favorite among many YouTube vloggers since it sounds good, has excellent features built-in, and is available at a superb price. Find out more about the Blue Yeti on Amazon.

- Custom three-capsule array: This professional USB mic produces clear, powerful, broadcast-quality...
- Onboard audio controls: Headphone volume, pattern selection, instant mute, and mic gain put you in...
- Four pickup patterns: Flexible cardioid, omni, bidirectional, and stereo pickup patterns allow you...
- Blue VOICE software: Elevate your streamings and recordings with clear broadcast vocal sound and...
Last update on 2026-03-13 / Affiliate links / Images from Amazon Product Advertising API
How do I turn off my webcam microphone & use my USB mic?
After installing your USB mic, you will need to disable your webcam’s microphone and set your new USB mic as the default audio input.
If you have an external microphone and are using Windows 10 do the following to disable the webcam’s microphone.
- Click the Start button.
- Click the Settings gear wheel icon that is above the Start button.
- When Windows Settings opens click on System.
- In the System list on the left click on Sound.
- At the end of your list of Input Device click on Manage Sound Devices.
- From the list of Output and Input devices that opens, click on Microphone, with the name of your webcam beneath it.
- Now click the Disable button.
- Finally, close the Manage Sound Devices window.
If you are using the internal camera on a laptop running Windows 10 the procedure is almost the same, except you need to choose the built-in microphone.
To set the USB microphone as the default audio input go back into your Sound settings but this time at step 5 above, instead of clicking on Manage sound devices, click on the dropdown menu to Choose your input device and choose your USB audio device.
Related Questions
How do I zoom in on my computer camera?
If you are using the Windows 10 Camera App, sadly, you can’t zoom in with your webcam. Even if your webcam’s recording software can do so. Instead, download webcam software for your webcam from the manufacturer’s website. For example, when using my Logitech C920 I can use the Logitech Capture Software![]() . In the controls, there is a zoom slider and pan/tilt arrows.
. In the controls, there is a zoom slider and pan/tilt arrows.
How can I use my DSLR as a Webcam?
Many DSLR or Mirrorless cameras can be used instead of a webcam on your laptop or desktop computer. However, you’ll probably need an HDMI cable and a video capture device (such as the Elgato 4K Camlink![]() ). However, 25 Canon cameras can be connected to a PC or Mac using a USB cable and behave like a high-quality webcam by first installing the free Canon EOS Webcam Utility beta software.
). However, 25 Canon cameras can be connected to a PC or Mac using a USB cable and behave like a high-quality webcam by first installing the free Canon EOS Webcam Utility beta software.
Can someone see you through your laptop camera?
Whether your webcam is built-in to your laptop or an external USB webcam, like the Logitech C920, there is always a risk that they may have been hacked into. My inbox regularly receives phishing emails encouraging me to click on a link that might lead to a risky site. Alternatively, the email perhaps has an attachment that if opened can release malware that assists to remotely take control of your laptop or PC.
I have watched ethical hacking students demonstrate how a malicious person might penetrate your defenses to activate a laptop’s webcam. That is why I have fitted covers to the webcams on my laptop and desktop computer. When I don’t need to use them, I have even disabled the one on my laptop and unplugged the one on my desktop.
In the summer of 2016, Mark Zuckerberg posted a photo that showed his laptop in the background. An eagle-eyed Twitter user noticed both the camera and mic jack appeared to be covered in tape.
You can draw your own conclusions. But if the founder of one of the world’s biggest tech companies thinks it is necessary to cover up his webcam can be sure that it is technically possible for someone to see you through your laptop camera, assuming they have somehow managed to gain access.
How do I use the webcam on my laptop?
Most modern laptops have a webcam, although it is likely to be of a lower resolution to most external webcams that may be HD1080p or even 4k.
To take a photo or record a video clip in Windows 10 click on the Windows start button.
Scroll down the list of apps until you get to “Camera” and click on it.
Alternatively, type camera in the Cortana search bar and click on “Camera“.
The Windows 10 Camera app will open and assuming your laptop camera is facing you, you should see yourself on the laptop display.
Make sure the camera mode (image or video) you require is selected.
If you hover over the circular capture button it will show either “Take a video” or “Take a photo” depending on the selected mode.
Click the circular capture button to either start recording a video or take a photo.
Once captured the photo/video thumbnail will appear in the bottom right-hand corner of the app. Click it to review what you have captured.
Tosh Lubek is an award-winning writer/producer who has worked in broadcast media since the early 1980s. Today he creates content for a variety of clients and teaches video production skills both face-to-face and online. He regularly hosts the video-booth at business EXPOs across Scotland and England.
Recent Posts
Most people use sandbags the wrong way. Here’s how to hang them properly on a light stand for maximum stability and safety — plus what to fill them with.
You're Using the Canon RF 50mm f/1.8 WRONG! Here’s How to Fix It
If you’ve recently picked up the Canon RF 50mm f/1.8 STM—affectionately known as the Nifty Fifty—you might be confused by that strange switch on the side of the lens. It doesn’t say AF/MF...
