
DIY Video Studio is supported by its readers. Please assume links on this site are affiliate links or ads, and that I get commissions for purchases made through these links. As an Amazon Associate, I earn from qualifying purchases. Thank you if you use any of the links.
The perceived loudness of YouTube videos can vary greatly, especially highly compressed music videos. To even out the loudest the YouTube Loudness standard. Videos uploaded since the introduction will undergo Replay Volume Normalization, also known as YouTube audio normalization. The intention is to improve the listening experience while watching consecutive videos on YouTube.
YouTube audio normalization
Streaming services, including YouTube, are adjusting the loudness of uploaded content. To put it another way, if your video does not conform to the YouTube loudness standards, they will adjust it for you. But not necessarily in the way you want. This is what’s called Replay Volume Normalization or YouTube audio normalization.
Checking my video uploads, I discovered the YouTube loudness standard started to be applied to my content sometime between 21st and 27th August 2016. However, the roll-out apparently started in December 2015. If you regularly upload videos, you can easily check when YouTube audio normalization was applied to your account. More on that later.
So, what happens when YouTube loudness normalization is applied to your audio.
If your audio is too loud, YouTube will bring it down. Unfortunately, the opposite is not true. If your audio is quieter than the ideal YouTube content loudness, YouTube does not make your audio louder.
Why does YouTube Content loudness matter?
So, what’s the big deal about loudness on YouTube?
It’s about viewer experience.
If you heavily compress the dynamic range of your audio to make it sound loud. By the time YouTube has normalized the loudness, your audio not only is quieter, but it also has less dynamic range. Meanwhile, other videos with a wider dynamic will sound just as loud and sound better.
But there’s a twist.
If your audio was too quiet for YouTube’s loudness standard, YouTube does absolutely nothing to make it sound as loud as other videos that have been normalized to the YouTube loudness standard. The result is your video may seem quiet compared to the rest in a playlist. The viewer must turn up the volume knob, which can be annoying.
Whether the audio is too loud or too quiet, the result is that you are not delivering a good viewer experience. Ultimately, that could harm your search ranking if YouTube sees viewers bouncing away from
One of the most important metrics for YouTube is Watch Time. It is used to help answer whether a video answers the viewer’s search question.
If people search for, “how to make candles“, and they watch all your video about making candles, that sends a powerful message. YouTube will assume your video is a satisfactory answer to the viewer’s question.
But say someone does that search but when they play your video, they discover the audio is too quiet. Remember, there are loads of other videos they could watch. If they click away, YouTube gets the message that your video is not the best result to answer the search question. Consequently, your video could fall in the rankings.
Unless you are the only person making videos in your niche, which is unlikely, it is important you do everything possible to keep the viewer watching. That includes getting your audio as good as possible.
You see, the better the viewer experience the longer they will watch, and the more likely YouTube will place your video higher in the search results.
How we measure loudness levels
The “decibel” is often used to describe the level or loudness of a sound. Unfortunately, the decibel can be a little confusing. If you would like to dive into more detail, check out my post, what is a decibel in an audio recording.
But loudness isn’t just about decibels.
Loudness is the volume of sound that a person feels, and it is the average sound level rather than the peak levels. Loudness also depends on the equalization of your audio and dynamic range compression.
So, although you keep the peak levels the same, you could make your audio sound louder by boosting certain frequencies and adding dynamic range compression.
To take account of the way people perceive loudness the International Telecommunications Union (ITU) developed a standard for loudness. The European Broadcasting Union (EBU) then suggested a revision.
You may hear the standard referred to as ITU BS.1770-3. But you may also come across ATSC A/85 and EBU R128. Don’t worry, the last two are based on ITU 1770-3.
This loudness standard has units to measure the loudness, and they are LKFS, LUFS, and LU. If you haven’t heard about loudness normalization you are probably asking what does LKFS stand for and what does LUFS mean?
LKFS, LUFS, LU and Program Loudness
LKFS is an abbreviation for Loudness, K-weighted, relative to full scale. It is used in the ITU BS.1770-3 standard and ATSC A/85 standard. It is an absolute
measure of loudness. For broadcasters using this standard, the program target loudness of audio is -24 LKFS.
LUFS is an abbreviation for Loudness units relative to full scale. It is used in the European EBU R128 standard. It too is an absolute measure of loudness. For broadcasters using this standard, the program target loudness of audio is -23 LUFS.
Both LKFS and LUFS are equivalent, and one unit is equal to one decibel.
LU is an abbreviation for Loudness Units, a relative measure of loudness and an attempt to have a more traditional number to work with. Whether using ATSC A/85 or EBU R128, the broadcaster can set the target loudness to be 0 LU. Again, one LU is equal to one
Program Loudness is the average loudness of the video content. It is measured from the start of the video through to the end. The smaller the number (i.e. closer to zero) the louder the audio. So, content normalized to -24 LKFS will be quieter than content normalized to -16 LKFS.
Now that we know some of the important loudness related terms, we can judge the loudness of our own videos.
How do I know if I have proper levels for videos on YouTube?
It is easy to find out whether your existing videos match the YouTube
Stats for nerds
All you need to do is open one of your videos on the normal YouTube watch page. Then move the volume slider fully to the right to the maximum setting. Now right-click on your video.

A window will open. Click on the last item in the menu, stats for nerds.
A small window will open and should look something like the image below, which is from one of my videos. The important part is the fourth line down called Volume / Normalized.
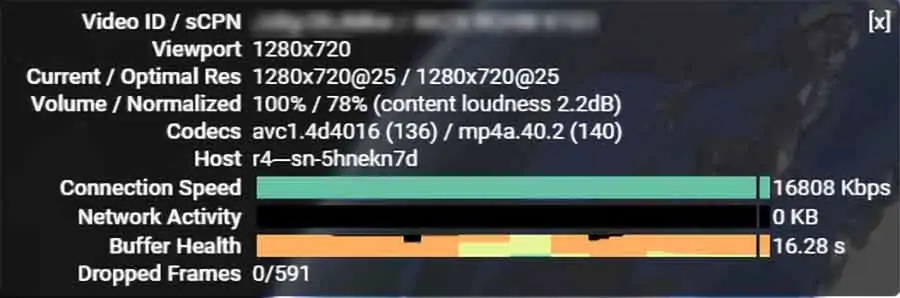
You can see that it says: 100% / 78% (content loudness 2.2dB).
100% refers to the position of the volume slider. I set it all the way to the right, the maximum, so the volume slider is at 100%.
78% means that YouTube’s Replay Volume Normalization algorithm has lowered the volume slider to 78%.
Content Loudness 2.2dB means that the average audio level of my video is 2.2dB too loud. The content loudness value is not influenced by the position of the playback volume slider.
YouTube has reduced my video’s audio level to the YouTube audio loudness specs. This way, my video will play at the loudness level YouTube considers to be correct for PC speakers and mobile devices.
Initially, this appears fine. All the videos watched by a YouTube viewer should play-out at the same loudness, so the viewer doesn’t have to adjust the volume control.
However, check out the stats for nerds on another one of my videos.
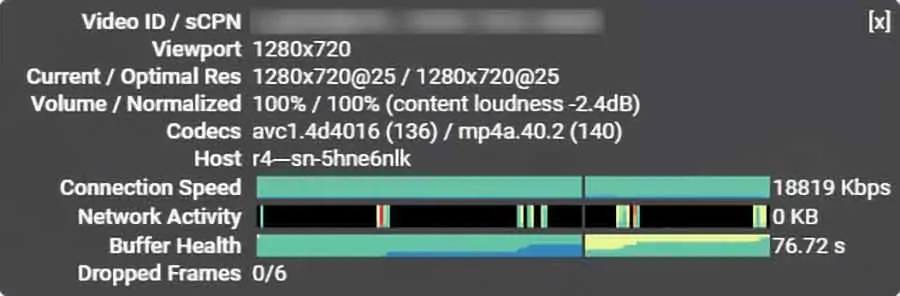
You can see it says: 100% / 100% (content loudness -2.4dB).
YouTube has left the volume slider at 100%. So far, so good. But the content loudness, being negative, means that the loudness of my video is 2.4dB too low for YouTube’s loudness standard.
Not to worry, surely YouTube’s Replay Volume Normalization will take care of that! Sorry, no it doesn’t!
YouTube has left the volume slider at the maximum setting of 100%. YouTube either cannot or won’t boost the loudness to match their loudness specs. So, if my audio is too quiet, it stays too quiet.
CONTENT LOUDNESS: Positive values mean your audio is too loud. Negative values mean your audio is too quiet.
Being 2.4dB too quiet isn’t the end of the world. Viewers, who have just watched a video with the correct loudness are probably going to be OK watching my video. But what if you get your levels wrong?
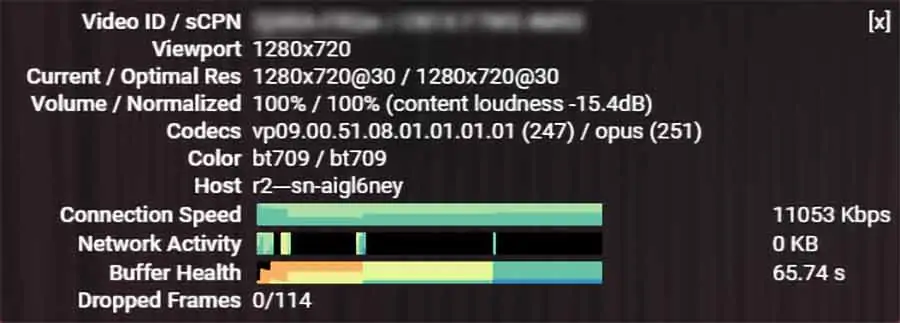
These are the details for a Dec 2018 video uploaded by YouTube staff. You would expect them to know the correct audio loudness levels to target. But no, their audio level is way too low. You can see the content loudness is 15.4dB below the YouTube loudness standard.
Before I could listen to what the person was saying, I had to turn up the volume quite a bit. No wonder. The standard content loudness is almost a factor of three louder than this YouTube video.
Now, imagine what happened when I played the next video on YouTube. It had been uploaded at the correct level and neither my ears nor my speakers were happy! It was not a good viewer experience as I reached over to turn down the volume knob.
When did my videos start to be normalized?
If you do not know when YouTube loudness normalization was applied to your videos check the Stats for nerds on your videos from about December 2015. If the Volume / Normalized figures show as 100% / 100% without any mention of content loudness, then that video is from before the time YouTube applied normalization to your channel. As you check later videos you will eventually find your first video that shows content loudness.
If you regularly upload videos, you will then have an idea of when your videos became normalized.
Checking video loudness before upload to YouTube
Use the LoudnessRadar in Premiere Pro and Audition
A normal bar meter is not going to display loudness for you. What you need is a loudness meter or something similar.
If you are using Adobe Premiere or Adobe Audition, you will have access to a powerful tool that allows you to judge whether you have your audio right when mastering for YouTube.
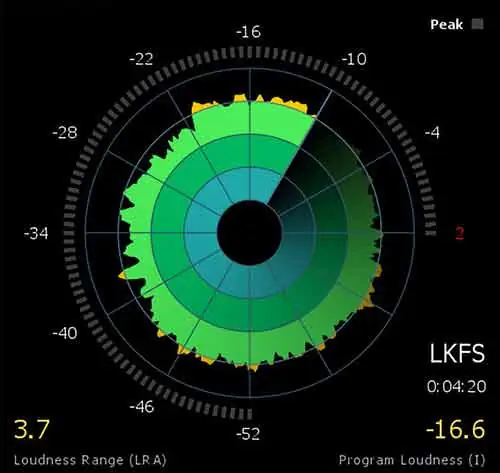
The tool is called LoudnessRadar and combines a level meter with a representation of the loudness of your audio. It also shows a lot more than that, but it can tell you what is likely to happen when you upload your video to YouTube.
Once you have set your loudness target, the different colors will help guide you in tweaking the audio levels in your video.
In the image above, I set my target loudness to be -16 LKFS. The areas where the the audio is yellow (just outside the second circle in), the audio is louder than my target. Where the audio loudness is below the second circle, the audio is less that the target loudness.
A little over or a little under is OK. What is important is the program loudness. This is the average loudness across the whole of the program or video. You can see in the bottom right of the loudnessRadar that after 4min 20sec the program loudness is -16.6 LKFS. That’s close to what I wanted. With just a little adjustment I could get the program loudness to be
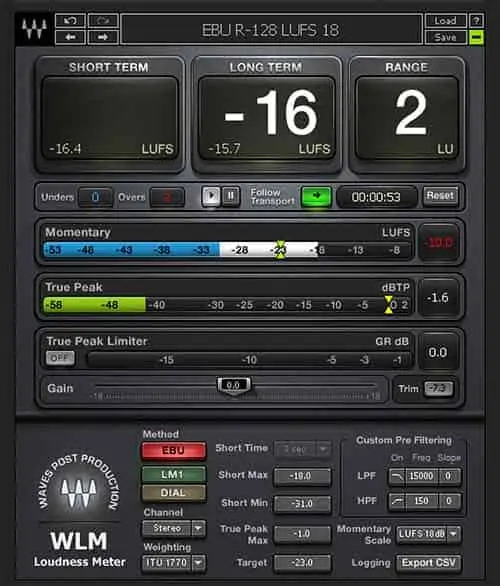
Download the Waves WLM Loudness Meter
If you wish to spend some money, I can recommend the Waves WLM Loudness Meter. It is available as a VST/VST3 plugin and works with various audio and video software. You can check the supported host software on the waves website![]() . The regular price is a little high, but I got the plugin for a few tens of dollars during one of Wave’s regular sales. Alternatively, try out the demo.
. The regular price is a little high, but I got the plugin for a few tens of dollars during one of Wave’s regular sales. Alternatively, try out the demo.
The “Plus” version of the loudness meter also allows you to normalize your audio and is ITU 1770-3, EBU and ATSC compliant.
Target loudness levels
If you are wondering what LKFS/LUFS levels you should be aiming for when delivering your video, here are the audio loudness targets for a few destinations.
| Final Delivery | Program Loudness |
| Audio CD | -15 LKFS |
| Online video | -16 LKFS |
| Broadcast TV (Australia, Japan, US) | -24 LKFS |
| Broadcast TV (Europe) | -23 LUFS |
| Cinema | -24 LKFS |
If you are making videos for YouTube, -16LKFS is a good loudness target to aim for. In my uploads, this resulted in my content loudness being just a little bit hot by 0.4dB. I would consider that to be OK. Not only am I almost bang on the money, but I am also just above the YouTube loudness standard. Sure, my audio will be turned down, but at least it won’t be left too quiet.
Just to be clear, I have used this loudness level on videos containing dialogue or speech. For instance, interviews and piece-to-camera videos. I do not produce music videos, but I have checked some music videos on YouTube. Mark Ronson’s Uptown Funk is played back at about -14 LUFS while other music videos are played back at around -15 LUFS.
Tosh Lubek runs an audio and video production business in the UK and has been using the Canon EOS R since it was released in the Autumn of 2018 and the Canon EOS R6 in 2020. He has used both cameras to shoot TV commercials broadcast on Sky TV, promotional business videos, videos of events and functions, and YouTube creator content. He has also won several international awards for his advertising and promotional work. You can meet him by visiting his “video booth” at HashTag Business Events across the country.
Recent Posts
Most people use sandbags the wrong way. Here’s how to hang them properly on a light stand for maximum stability and safety — plus what to fill them with.
You're Using the Canon RF 50mm f/1.8 WRONG! Here’s How to Fix It
If you’ve recently picked up the Canon RF 50mm f/1.8 STM—affectionately known as the Nifty Fifty—you might be confused by that strange switch on the side of the lens. It doesn’t say AF/MF...