Author: Tosh Lubek Published: 13th July 2023
DIY Video Studio is supported by its readers who use the affiliate links or ads on this site. As an Amazon Associate, I earn from qualifying purchases. Thank your support if you use any of the links.
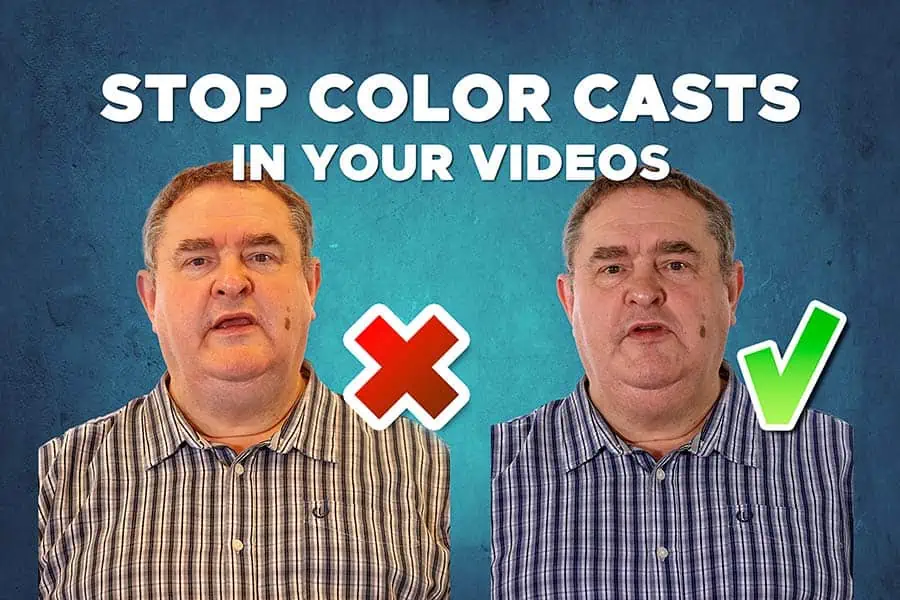
I recently shot a video at a client’s premises and almost made a rookie mistake. Thankfully, I noticed the error and put it right before any harm was done. If I hadn’t, at best I would have faced a lot of unnecessary color grading, and at worst my footage may not have been useable.
So, what was the mistake?
I accidentally mismatched the color temperature of the lighting!
If you don’t already know, lighting is said to have a color temperature, which describes the color tone of the light. Warm lights have an orange or yellow tone, cool lights are blue-white, and daylight bulbs appear approximately white. This is a big issue when it comes to video lighting.
I go into more detail in my article The best color temperature for video lighting.
But in this article, I want to talk about my near-disastrous mistake of mixing different color temperature lights and explain what you can do if you find yourself in the same situation, whether you’re shooting YouTube videos or on a Zoom call.
You can watch this post as a video, or carry on reading and get the benefit of being able to skip it re-read sections. You’ll also find links to products that can help you solve the color problem.
Why color temperature can be a problem in videos
Because human eyes do not function in the same way as cameras, we can perceive the scene in an entirely different way. That’s because the brain processes the image before we “see” it. So, whatever mix of “white” lights you use, you’ll think there’s nothing wrong or that the same color temperature white light has been used.
But cameras are different. They assume that the lighting has one color temperature. So, if the camera thinks you are recording under “daylight” and you introduce a warm light into the scene, like a candle, the warm light will appear orange-yellow. It’s a desirable effect when using a candle because it looks realistic.
The real problem occurs when a significant amount of warm light is mixed with the daylight lighting, or when a small amount of warm light is concentrated on the subject.
Does this only happen with warm light
No, you can get other strange lighting effects by mixing lights with different color temperatures.
In my example of mixing different color temperature lights, I’ve talked about a scene where daylight lighting is used, and some warm lights are added. But we could use warm video lights and adjust the camera’s White Balance accordingly. The camera would compensate for the warmer light and the scene would look normal again, just as if we used “white” light. But if we shine some light from a daylight-rated bulb onto the subject’s face, it would this time take on a bluish tint.
When can mixing different color temperature lights be a problem
I’ve come across a couple of situations where a color cast on my video footage was possible. Those color casts were either orange or blue and I discuss those situations below.
Video has an orange color cast
This brings me back to my original potential mistake.
I was set up to record talking head videos. As, usual, I was using daylight-rated LED lights because this would approximately match any daylight that might leak into the room.
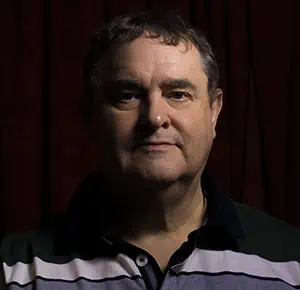
This image of me using the setup shows what happens if a small amount of daylight comes through the window. The window light only causes a slight highlight on the left of my face, but it does not affect the color tones.

However, as well as windows, the room also had recessed ceiling lights, and these were the cause of my potential problem. Like most room lights, they used warm white bulbs. Meaning that their color temperature was lower than that of my daylight video lights. When the nine ceiling lights were switched on, they significantly add to the overall room illumination.

You can see what happens in this next image. The camera, even though Auto White Balance (AWB) is selected, continues to assume that the overall lighting has the same color temperature as daylight. Consequently, my face and shirt all take on an orange-yellow tone.
In theory, you might be able to correct the orange tone through color grading. However, this is time-consuming, and you need to know how to do it. But there’s a further problem with ceiling lights, and it’s their position.
If you place a light above someone’s head you will get shadows below their eyebrows, nose, lips, and chin. Essentially, any part of the face that sticks out will be illuminated and any part that is obscured will not be illuminated. But if you look at the image again you won’t see those downward shadows. Why? That’s because the daylight video lights, which were at head height, have filled in the shadows.
You might think that if the shadows are being filled in, then the problem has been fixed. In fact, it’s created a problem that makes color grading difficult. What we now have are areas with differing levels of daylight and warm light. The parts of the face that have more incident warm light appear more orange. While those areas below the eyebrows, nose, lips, and chin received less warm light, so they appear less orange.
Video has a blue color casts
We’ve seen that room lights, which are often a warm white, can cause color problems when you use daylight video lights. So, you might think that the solution might be to just rely on the interior lighting and dispense with the video lights or use warm video lights.
That’s exactly what I have done in the past.
I once had to record an inter-agency conference in a ballroom that had ceiling-to-floor windows along one side. The white balance on my camera was set for the warm interior light, so in the footage, most of the delegates had normal skin tones. Unfortunately, anyone near a window had more daylight on them than room light. Consequently, they and the area around them appeared blue.
How to prevent these orange or blue color casts
The easiest way to guard again color casts in your video footage is to ensure you do not use lights that have different color temperatures.
If you are shooting in a room where window light is coming in, you should use a daylight-rated video light. Although the color temperature of daylight does vary across the day, for most of the day the color temperature of a daylight-rated video light will be close enough.
The time of day, when the color temperature of daylight will definitely not match your daylight-rated video light, is during the so-called “golden hour”. This is the hour after sunrise or before sunset when the light of the sun can have a distinctly golden or even reddish hue. Also, the color temperature of daylight will change much more rapidly during this time than when the sun is higher in the sky.
But the most important thing to remember when shooting indoors with daylight-rated video lights is not to turn on the room lights. You’d be surprised how easy a step this is to get wrong. Since you’ll be concentrating on your subject and the back of the camera it’s easy to be oblivious to everything else around you. Moreover, if just you’re using the LCD screen on the back of your camera, problems with the color balance can be missed.
So, just like pilots have a pre-flight checklist, you can create your own checklist for a video shoot and include a visual confirmation that the room lights are off.
If you have no option but to shoot with the room’s warm white lights on, adjust the color temperature of your video lights. If your video light has a color temperature dial, use this to warm up the color temperature. If your video light is daylight only, it probably came with an orange slot-in filter so that it can be used as a warm light.
If you are a beginner and are unsure of your camera’s controls you might be best selecting Auto White Balance (AWB) and letting the camera choose the white balance. If you are more confident in the use of your camera or want more control, you might wish to set a custom white balance. This often involves the use of a white or 18% gray card as a reference in the location where you will be shooting. Taking care of your lighting and setting a custom white balance is one way you can ensure your footage looks good every time.
I own a few different 18% gray cards and color checkers, here are the three I like best for performance and value.
Last update on 2025-10-20 / Affiliate links / Images from Amazon Product Advertising API
Summary
If you’ve read through to the end, you should now have a good understanding of why your videos might sometimes have an orange color cast. You should also have got a grasp on what you need to do to ensure you don’t make the same again. Getting the white balance wrong because of your lighting is a beginner mistake, but it’s surprisingly easy to do even after gaining a bit of experience. Not long ago I had set up to shoot an interview and went to fetch my interview subject. While I was gone a well-meaning person switched on the room lights, presumably thinking I had forgotten to do so. Fortunately, I noticed what had happened on my return to the room.
Here’s a big ask from me: If you liked this article, please share it.
It will mean a great deal to me if you share this post because a few seconds of your time will seriously help my blog grow. The share buttons are below the “About Author” section.
Thanks. 🙂
About the author: Tosh Lubek is a multi-award-winning broadcaster, writer, and video producer, with 40 years of experience in professional broadcasting and has been using Canon video and stills cameras since 2010. He has worked with radio and TV broadcasters, advertising agencies, and direct clients on a variety of projects including radio and television advertising, online video production, corporate videos, award ceremony motion graphics, and theme park sound design. Tosh has won numerous awards, including a Radio Academy Awards Gold Sony, a Gold, Silver, and Bronze World Medals in the New York Festivals International Advertising Awards. Since about 2007 he has been creating YouTube videos. Tosh has been a sponsor of the “video booth” at HashTag Business Events across the UK.
Recent Posts
You're Using the Canon RF 50mm f/1.8 WRONG! Here’s How to Fix It
If you’ve recently picked up the Canon RF 50mm f/1.8 STM—affectionately known as the Nifty Fifty—you might be confused by that strange switch on the side of the lens. It doesn’t say AF/MF...
Recently, I shot several customer testimonial videos in 4K for a client when the overheating warning on my Canon EOS R6 appeared. In fact, it appeared three times in five sessions during the day of...


