
DIY Video Studio is supported by its readers. Please assume links on this site are affiliate links or ads, and that I get commissions for purchases made through these links. As an Amazon Associate, I earn from qualifying purchases. Thank you if you use any of the links.
Audio Clipping
Does this sound familiar?
You’ve just finished recording your latest video and you play it back and instead of hearing pristine audio, everything is too loud and messed up. Yep. Your audio is clipped and distorted. But it doesn’t have to be that way. Clipped audio is not inevitable. You can easily prevent audio clipping by just using your eyes and the meter on
In this article, I will show you how to tell if your audio is clipping. But more importantly: I’ll explain what you need to do to ensure you avoid clipping your audio and never again end up with a distorted and useless recording.
If you already have some clipped audio, I will also explain what you can do to fix audio clipping at the end of this article.
What is audio clipping
So, what is audio clipping?
In digital audio, we have a limited range of sample values to represent the audio signal. Assuming the recording is a 16-bit audio file, the largest sample value we can ascribe is 32,767. This will be the situation when our input has reached 0dBFS on a digital meter.
Up to this point, we can record all the information about the input signal. The 32,767 samples are enough to describe the audio.
But say we double the input signal by turning up the microphone gain.
We would need twice the sample value, i.e. 65,534, to record all the information about the louder audio signal. Those extra samples are not available in 16-bit audio, so our input overloads the digital recorder.
All that extra information about the input signal will be lost because when we hit the maximum sample value.
Simply put, we have run out of zeros and ones to describe the input signal
All levels that are higher than 0dBFS on our meter will saturate to our maximum sample value of 32,767. Whatever the original signal, that data will be lost and the audio will be clipped.
To illustrate what I mean, think of a beautifully smooth sine wave. As the input level increases the peaks get higher until they reach 0dBFS on our digital meter.
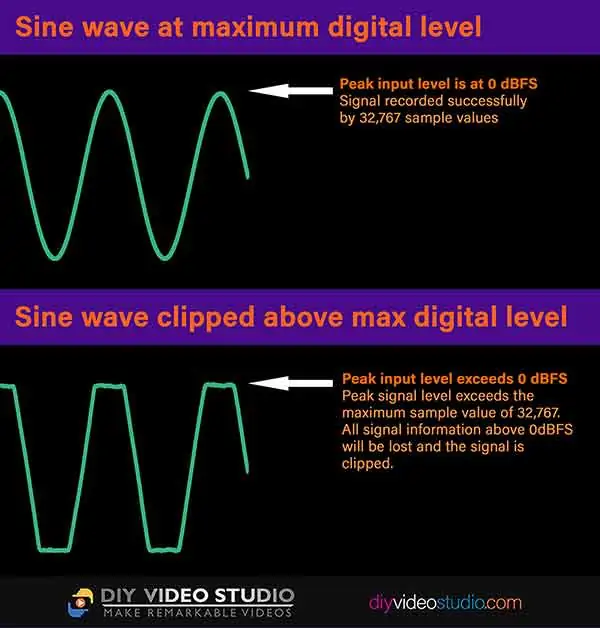
With digital clipping, the peaks are chopped off the smooth sine wave. It effectively becomes a square wave, and the result is harsh distortion.
What causes audio clipping
If your audio is clipping, you are overloading your audio interface or recording device. In doing so, you have run out of headroom in your recording equipment. Headroom is that safe margin you should leave between your audio peaks and the 0dBFS maximum that you can record.
A lack of headroom may result in your highest peaks being clipped. But if you set your input levels much too high you may find that all the audio peaks are clipped. This potentially can lead to digital distortion.
If you have turned down your input levels and all your audio is still clipping, along with noticeable distortion, you may be feeding the wrong type of level into your recorder.
Your audio interface or video camera may be expecting microphone level. But if you are feeding in “line level”, your recording equipment will be overloaded.
The voltage of microphone level is typically in the order of millivolts, whereas “line level” will be around 1 volt. That is a considerable difference. Obviously, “line level” and “microphone level” signals will not match and cause problems.
Some cameras, such as the Canon XF100, have switchable inputs. This allows recording from either a microphone or an audio mixing desk.
Microphones can also vary in the amount of signal they feed into your audio interface or camera. Dynamic mics typically have lower outputs than condenser mics. So, condenser microphones often include a Pad or attenuator switch to help prevent overdriving the mic-preamp. This is useful when recording extremely loud
How to tell if your audio is clipping
When recording into a DAW
When recording audio directly into your DAW you will be presented with visual information that will allow you to judge whether any clipping is taking place.
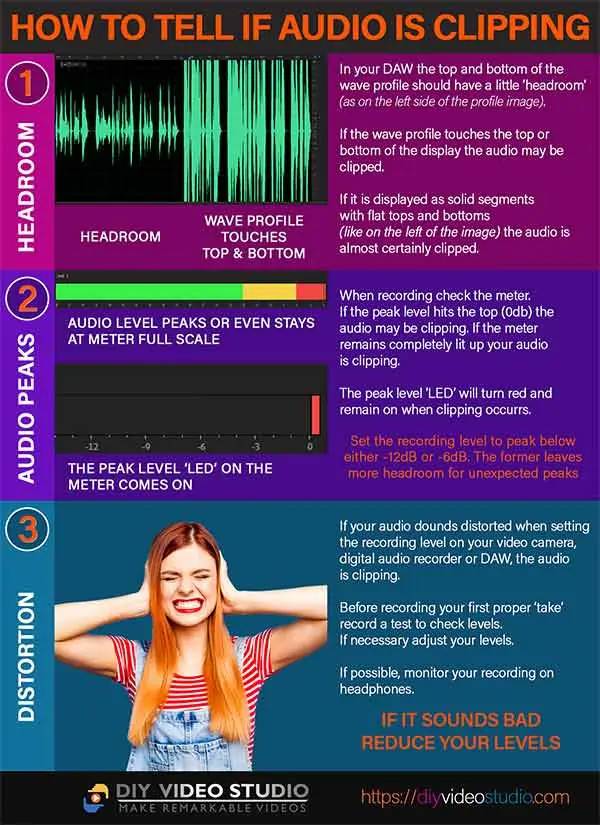
Keep an eye on the audio waveform profile.
If occasionally the peaks touch the top/bottom reduce your input level to avoid any further clipping. If you are driving too much signal into your mic pre-amps the audio may remain clipped for longer
Check the meter on your DAW.
Usually, it goes from green to yellow to red. It’s a bit like traffic lights. If the level displayed on the meter is in the green you are safe
When in the yellow (or amber) you are still OK but watch out. Once the level is in the red you are in the danger zone close to audio clipping
If the meter is fully lit up and appears static even the lows in your audio are louder than your audio gear or DAW can cope with. In this
Keep an eye on the peak ‘LED’ indicator.
Use your ears.
If you are recording someone else, you should be monitoring the recording on studio speakers or headphones
When recording to a video camera or digital recorder
When recording to a video camera, camcorder, or digital audio recorder the situation is a little different.
Now you only have an onscreen level meter and your ears to check whether the audio is clipping. You no longer have the DAW’s wave profile to help you.
The useful tool at your disposal is the audio level meter
If you have a domestic camcorder the level meter may be quite simple. It may not provide any quantitative information about your audio levels
A more expensive recorder will have a more quantitative level meter that shows decibel levels so that the input level can be judged more accurately.
As with the DAW, there is usually a red LED that turns on for a moment if clipping has occurred.
If you are monitoring the recording with headphones, you will also be able to tell whether any clipping produces noticeable distortion.
Summary of how to tell if audio is clipping
What does audio clipping sound like?
Earlier in this article, I explained what a sine wave looks like and how it can effectively change into a square wave if it is significantly clipped
They say, “seeing is believing”, but in this instance, hearing an example of a sine wave and a clipped sine wave will be much more useful. I have prepared examples of unclipped and clipped sine waves.
Although a sine wave is not hugely musical, I think you will agree that it is much more pleasant on the ear than a square wave.
Although I have reduced the level of both recordings I would recommend turning down your speaker/headphone volume before playing the audio.
WARNING
REDUCE YOUR SPEAKER OR HEADPHONE LEVELS BEFORE PLAYBACK
Speech audio clipping example
In the example audio clip below, you can listen to a voice that is first recorded with sufficient headroom and then with the input level far too high. The resulting audio is so badly clipped it has resulted in digital distortion.
How to always avoid audio clipping
Although it might be possible to fix your clipped audio, it is always far better to prevent audio clipping in
That is easy for me to write but sometimes you may still have problems with audio clipping. Even if you have properly set your recording levels to peak between -6 and -12 dBFS, an occasional transient may exceed the headroom you have carefully left.
You may be shooting an event where you only get one chance to record the audio. The person you are interviewing may suddenly cough, laugh or say something that is much louder than their normal speech. Alternatively, you might produce cooking videos and an electric food processor may be much louder than expected, and you end up with clipped audio.
We’ve all been in a situation like that.
But you can prepare for those unexpected peaks.
a: Use the built-in audio attenuator

The first option you can try is to use any technology built into your camera or recorder.
If your recorder has an attenuator try enabling it
For instance, by enabling the attenuator on my Canon EOS R mirrorless camera the camera will automatically suppress distortion caused by loud noises.
b: Protect your recording with a safety channel
The next option to prevent audio clipping in the mix is to record a safety track alone side your normal audio track. This can be done in a few ways, depending on your equipment.

The idea is to record either two files or two channels at two input distinct levels. The first is set to record at your standard peak level, and the second is set to record at a lower level. The difference between the two recording levels can be set according to your personal preference. But the lower level is often set to be 6, 12, or 18dB lower than the main recording.
Should your normal recording suffer audio clipping you can replace it with good audio from your safety track.
Easy safety track using Tascam Dual Mode recording
If you have a Tascam digital recorder that offers dual-mode recording, you can record a single audio input to two separate files.
The input to these two files can be at two different input levels. Set the first to record at your standard peak level. The second can be set to record at a much lower level.
Simulate Dual Mode recording with microphone Y cable splitter and Zoom Handy recorder

- Balanced XLR Splitter Cable, 1 XLR Female to Dual XLR Male, This XLR Y-cable is designed to connect...
- Compatible with equipment with 3-pin XLR connectors: XLR Female: microphone, mixer output; XLR Male:...
- Balanced XLR Connection - pin 2 is connected to pin 2, pin 3 is connected to pin 3, pin 1 is...
- This xlr splitter cable with 20 AWG 4N Oxygen Free Copper, with shielding ensure high fidelity sound...
Last update on 2026-03-01 / Affiliate links / Images from Amazon Product Advertising API
If you don’t have a Tascam recorder there is an alternative solution to recording a safety track and prevent audio clipping in your final mix.
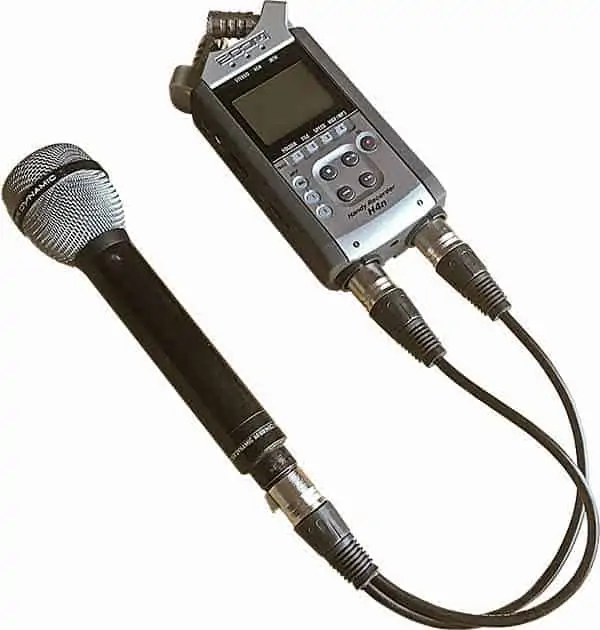
I use a Zoom H4n digital recorder to record a lot of my audio when shooting with my mirrorless camera. However, this method also works with any digital recorder that has two independent inputs, such as the Zoom H5.
This allows the mic signal to be recorded to two separate channels, at two different input levels. The result will be your normal audio on the left channel and your safety audio on the right channel. You can then select the required audio in your video editor.
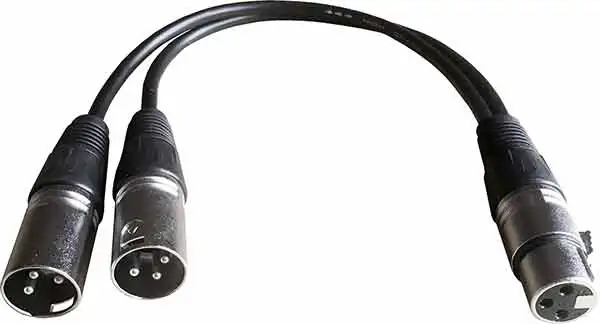
To connect the microphone to both XLR inputs, I use a 12inch mic cable Y splitter with XLR female to dual XLR male connectors. Using the splitter cables enables me to feed the same audio into both external inputs.
The Y mic cable splitter works well with my set up and is available inexpensively from Amazon.
In the Zoom digital audio recorder’s 4CH mode, I set my normal recording level on Input 1 and will reduce the recording level on Input 2 by about 12dB. To be sure I avoid almost all cases of audio clipping I could go even lower in reducing the input level. For instance, I could set it to about 18dB below the level of Input 1.
This solution works well with my Zoom H4n recording setup, although it should also work with the Zoom H5 recorder. However, if I place the microphone close to the person I am interviewing I will add a 5m or 10m microphone cable between the mic and the Y mic cable splitter. The best price for the splitter that I found is on this Amazon listing![]() . Make sure you get the single female XLR to dual male XLR splitter.
. Make sure you get the single female XLR to dual male XLR splitter.
DIY microphone audio attenuator
If you are using a microphone that connects to your camera or recorder with a 3.5mm jack you could consider a DIY signal attenuator.
The idea is to send an identical mono signal from your microphone along the left and right channels of a stereo cable. Before the cable plugs into the camera/recorder, the signal is attenuated on the right channel (or the left channel if you prefer).
The result is that audio is recorded at a normal level on the left channel and the same audio is recorded at a lower level on the right channel.
The right channel becomes your safety channel and can be used to recover any audio that is clipped on the left channel.
To create the signal attenuator, you need the following:
2x standard 3.5mm female jack sockets, 2x resistors (their values will depend on the amount of attenuation required), connecting wire, heat-shrink tubes, a housing for the components and some glue.
Details of how to create the DIY microphone attenuator can be found in this separate article.
Safety Channel recording using the Rode Videomic Pro+
This must be the easiest way of recording your audio with a safety channel.
The RØDE VideoMic Pro+ is an on-camera shotgun microphone and is designed for use with camcorders, DSLR cameras, and portable audio recorders.
If you can learn more about it on the Rode website![]() , but one of its features is the inclusion of a Safety Channel.
, but one of its features is the inclusion of a Safety Channel.
The built-in Safety Channel technology can output the audio signal as a dual mono signal, reducing the level on the right channel by 10dB. Any spikes that cause audio clipping on the left channel can be replaced with audio from the right channel.
The Safety Channel can be enabled or disabled by a combination of button presses. In the disabled mode, the output signal on the left and right channels is the same.
Already recorded? Fix audio clipping in post-production
You already know that it is best to prevent audio clipping in your video recordings.
But let’s be honest…
Audio clipping is bound to happen at some point in your video career. None of us are perfect from the get-go.
Since we know audio clipping is going to happen, it is worthwhile knowing how it can be repaired. But we should not assume all clipped audio can be repaired. If it could, we wouldn’t need to worry about preventing it.
You will have the maximum success in fixing clipped audio if it is lightly clipped. However, badly clipped audio can sometimes be rescued to the point where it is acceptable.
The point at which you think the repair is acceptable will probably depend on whether your recording was a one-off. If you can re-record without clipping, that might be a better option. Just remember that your audience has a low threshold of tolerance when it comes to poor audio.
As I said above, during audio clipping data samples above 0dB will be lost in your recording. What software repair effects try to do is to reconstruct the clipped regions. This is done by interpolating the lost signal from the information that was recorded. The software literally attempts to recreate or redraw smooth tops to the peaks in the audio waveforms.
Whichever software you plan to use, a good first step is to reduce the overall level of your audio. Select all the audio and reduce the gain by several dB. Note that some software, such as Audacity, includes this step as part of the repair effect.
The purpose of the amplitude reduction is to give the repair algorithm some headroom. The clip repair or de-clip process needs that extra headroom in which to redraw the lost peaks in the audio.
a: Audio clipping fix in Audacity
If you are working on your audio in Audacity, clipping can be repaired by using Clip Fix. You will find it in the Effect menu.
Highlight the section of clipped audio then go to Effect > Clip Fix.
The Clip Fix effect includes a parameter: Reduce amplitude to allow for restored peaks (dB). The default number is -9dB, but you can change the amount as required. This reduces the level of the selected audio to provide the headroom required for the reconstruction of the waveform.
The Threshold of Clipping parameter determines how close to the maximum sample level any sample must be to be considered clipped. The default level is 95%, but you can use the slider to vary this figure and preview the result. With a little trial-and-error, you will find the best sounding result. Then click OK to apply the effect.
b: Audio clipping fix in Premiere Pro
To get the best view of your audio waveform, enlarge the height to the audio track you are working with. Do this by selecting the bottom of the track, just to the left of the clip area. When your cursor changes, right-click and drag down the bottom of the track to enlarge the vertical size.
With the waveform easier to see, check where you have any potential problem areas. With a better idea of what needs fixing, Right Click on the audio clip, and select Edit Clip in Adobe Audition. Once you are in Adobe Audition follow the instructions in the next section.
When you have finished repairing the clip, ensure you save the audio so that the clip updates in Premiere Pro.
c: Audio clipping fix in Adobe Audition
If you are editing your audio in Audition, load the recording and then open the diagnostics panel. Ensure you have DeClipper selected in the Effect drop-down menu.
Next, select the preset that you think represents the amount of audio clipping in your recording. You have four choices for restoration. Default, Lightly clipped, Heavily clipped, and Normal. In my experience, choosing Heavily clipped seems to work best most of the time.
Now click the Scan button. Adobe Audition will scan the audio, looking for problem areas that require fixing. When the program has finished scanning a list of problems will be displayed at the bottom of the panel.
The next step is to click Repair All and DeClipper will work throughout the areas that need fixing.
The peaks in your audio should now be redrawn and the should audio better. You will also notice Adobe Audition has reduced the overall level of the audio. You may wish to raise it again while applying a limiter to the newly recovered peaks.
Finally, save your audio.
d: Audio clipping fix with iZotope RX 7 De-Clip module
I’ve been using izotope’s RX Elements to clean up the audio for my videos. First RX6 and now RX 7.
The RX Elements module is great at cleaning up clicks, pops, hum, noise, and clipping. In September 2018
iZotope’s RX 7 Elements works as a VST3 plugin. In my testing RX7 Elements works in Audacity, Adobe Premiere Pro CC2018, and Adobe Audition CC2018.
However, to get the full benefit of the Repair Assistant, install the standalone RX Audio Editor.
- Using the RX Audio Editor open the audio you wish to repair. Note that you can open the audio straight from your video files. I have opened QuickTime MOV files from my iPhone/iPad video shoots as well as mp4 files from my Canon EOS R mirrorless camera.
- Next, drag the cursor across the distorted part of the audio to select it. If audio clipping is present throughout the audio clip, select all of it.
- In the top right corner of the screen click the Repair Assistant button to open the Repair Assistant window.
- Assuming you have been recording speech click the Dialogue button and then click Start Analysis.
- Once RX Elements has completed its analysis it will tell you whether it has detected any clipping, clicks, hum, or noise. If any faults are detected, such as clipping, suggested repair options will be displayed.
- You can choose from Light, Medium and Heavy repair options. Click on each to preview the repair.
- With your preferred repair option high-lighted, click on Render to apply the suggested repair plug-ins.
- Now go to File > Save As... to save the repaired audio as a Wav, AIFF, FLAC, or OGG file.
- Finally, replace the video clips’ audio in your video with the repaired audio file.
If you wish to set the repair parameters yourself, the repair tools are available on the right-hand side of the screen. Just select the region you wish to repair, click on the tool you wish to apply, then adjust as required.
RX Elements by iZotope is normally $129 but I bought it in the recent sale for $29. I really liked version 6 but after playing around with RX7 Elements my impression is that it really is awesome. Even at full price I really would recommend the Elements version of RX 7.
If you would like to try RX 7 as a free trial, download the DEMO![]() from the iZotope website.
from the iZotope website.
Source: Wikipedia![]()
Tosh Lubek runs an audio and video production business in the UK and has been using the Canon EOS R since it was released in the Autumn of 2018 and the Canon EOS R6 in 2020. He has used both cameras to shoot TV commercials broadcast on Sky TV, promotional business videos, videos of events and functions, and YouTube creator content. He has also won several international awards for his advertising and promotional work. You can meet him by visiting his “video booth” at HashTag Business Events across the country.
Recent Posts
Most people use sandbags the wrong way. Here’s how to hang them properly on a light stand for maximum stability and safety — plus what to fill them with.
You're Using the Canon RF 50mm f/1.8 WRONG! Here’s How to Fix It
If you’ve recently picked up the Canon RF 50mm f/1.8 STM—affectionately known as the Nifty Fifty—you might be confused by that strange switch on the side of the lens. It doesn’t say AF/MF...
