
DIY Video Studio is supported by its readers. Please assume links on this site are affiliate links or ads, and that I get commissions for purchases made through these links. As an Amazon Associate, I earn from qualifying purchases. Thank you if you use any of the links.
If you build it, he will come.
Field of Dreams, 1989 Universal Pictures
In the movie “Fields of Dreams”, Ray Kinsella hears a voice that encourages him to build a baseball field on his Iowa farm, with the promise that something magical would happen.
If you’re struggling to record enough content made for your YouTube channel let me whisper in your ear, “If you build your own DIY video studio, videos will come”.
OK, I know that sounds a bit “mushy” but it’s not far from the truth. Here’s the thing. If you have your own video studio where you can walk in at any time, turn on the lights and start recording, those videos will come much more often. You will be much more productive when it comes to content creation.
How to create a home DIY video studio
- Choose a room with enough space for you and your equipment that’s also quiet.
- Decide on your background.
- Use window light or invest in Softboxes or LED lighting.
- Use an HD camera on a tripod.
- Record good audio with a lavalier or short shotgun microphone.
This checklist is really all you need to set up a YouTube studio in your home or office. The level of sophistication depends on the type of videos you want to make but the checklist still applies but the way you implement it will change. Say you want to make talking head videos, like a vlogger, then you’ll not need much space. You could even just sit in front of the window with a laptop and webcam. But if you intend to interview people or have a cooking or beauty channel, you’ll need more space for your set. If you’re starting a YouTube gaming channel the studio checklist still applies. This time you’ll probably want to switch out the cloth backdrop for a collapsible green screen such as the one manufactured by Elgato.
So whatever type of studio you need, just follow the checklist. You may find that you don’t need everything or perhaps a variation of some of the items. For instance, if your walls are already matt white then forget the backdrop and shoot in front of the white wall.
Essentially you are creating a space where you are in complete control so your videos will look how you want them to be. The background, lighting, and sound will be yours to manipulate. Above all, it’s a place where you can feel comfortable in front of the camera.
Don’t worry if the list seems a little daunting, I’ll next go through each of the items on the list.
YouTube home video studio setup step-by-step
1. Choosing the right room
The size of your home or office video studio will probably be determined by what rooms you have available. Obviously bigger is better since you won’t keep tripping over your equipment, but if all you have is the area around your desk, honestly, that can be enough.
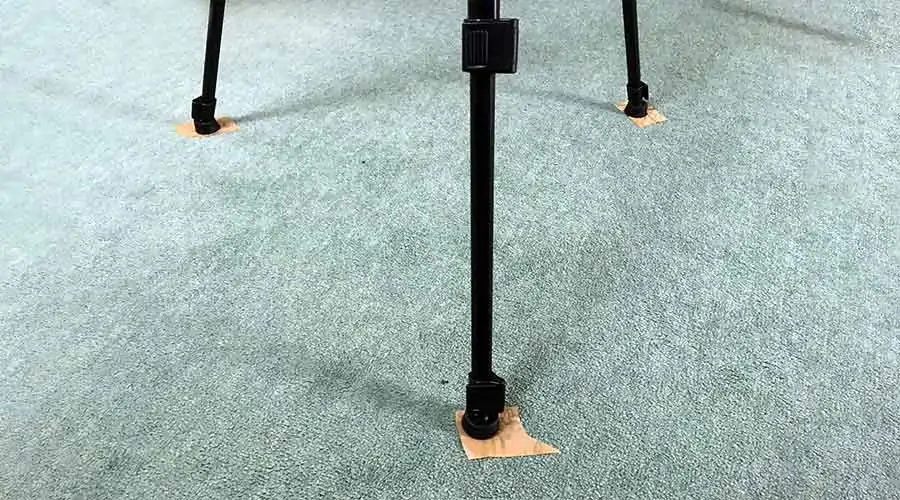
What’s more important is that it’s a dedicated space for your filmmaking. It will be much better if you are able to leave your equipment permanently set up. You won’t waste time setting up and clearing down, plus you’ll be much more productive. The other main reason for having a dedicated space the look of your videos will be consistent from shoot to shoot. So, if you shoot footage each day and then edit the clips together, your audience shouldn’t be able to tell you didn’t record everything in one session. Second-best is a temporary studio but always in the same space so you can erect your video gear in the same way every time. To make everything repeatable mark the floor with a pen or some tape so you can put your tripod and light stands back in precisely the same spot.
From my own experience, and from research I’ve done, the ideal space is between 12’x12’ and 15’x15’. However, not everyone is blessed with large rooms. I have set up a backdrop, 4 LED lights, and my camera for a full height talking head video in a 9’x17’ room. It was a squeeze getting my 6.5’x8’ backdrop in front of the far wall. A larger room, say 12’x17’, would make your video production a good bit easier. If you don’t need the backdrop a much smaller space will do.
This image shows a room where I’ve shot dozens of videos. The room is about 9ft wide, making it a tight squeeze for my 6.5 x 8ft (2 x 2.4m) collapsible white backdrop.
One other consideration regarding room space is the ceiling height. Most rooms tend to be about 8’ high. That’s OK, but if you want to use a hair or rim light it might be awkward if you want to use a large softbox light since it will be bulky.
Finally, if you have a choice, pick a room where there is little background noise. If you have noisy neighbors, you may have to schedule your recording sessions at a time when they aren’t about or perhaps after they’ve gone to bed. You may also want to avoid aircon and fans that would produce background noise, otherwise, you will need to remove it in post-production.
2. Decide what background you want to use
In a home studio, you are most likely going use a backdrop if you’re recording a talking-head video or want to do green screen work. In both cases consider using one of the walls and paint it either white, another neutral color, or chromakey green.
If you don’t like plain white you can always use some interesting lighting to change the way the background looks by casting shadows or using color gels in front of your lights.
One advantage of using your wall as the background is that you’ll save yourself some space because you won’t need to set up support stands for your backdrop.
If you are going to use a backdrop you have a few options to choose from.
Seamless background paper is a great choice in your YouTube setup because it’s available in several colors, and as the name suggests, there are no ugly creases or wrinkles.
Muslin backdrop cloth is cheap and easily available from online suppliers and often available in white, black, blue, or green. The top edge has a pocket so the cloth can hang from a backdrop support crossbar. The one main disadvantage is that while in storage, the cloth will pick up creases where it has been folded.
Collapsible or Pop-out backdrops are made from material stretched over a flexible steel frame. They are normally rectangular with rounded corners and often reversible, meaning one side may be white and the other black (or green and blue). Three edges have material or Velcro loops so they can be hung from a backdrop support. Pop-out backdrops fold down to a small circle, even the large ones, particularly useful if you need to store them. They are easy to open out, but you may need a bit of practice in folding them for storage. Unlike plain muslin cloths, the pop-out backdrops are less susceptible to creasing.
Supporting your backdrop
Whichever type of backdrop you choose, you’ll need to hang it. If you want to save space and money you can pin or tape any of these backdrops to your wall. However, depending on your materials, you may cause some damage to your wall. The more professional-looking solution (although it’s only you who will see it) is to use a backdrop support kit. This is a lightweight frame, usually made of aluminum tubing. The side supports are like light stands but have a threaded bolt protruding from the top. The backdrop is hung from a crossbar, which is then fixed to the supports.
What exactly is a video background? Well, it’s the background to your video and it can come in a range of “flavors”. The background can be a plain color, such as white, black, green, or blue, or an interesting photo studio background. If you’re planning to create a set in your studio, your set wall will simply be your background. Let’s look at some options.
3. Home video studio lighting
Use window light
If you are just starting out with video, consider using daylight. It can be especially effective if you paint your walls and ceiling white. That will help reflect the light around your studio space. Of course, the downside of using daylight is that the sun doesn’t shine all the time.
Film when the sun isn’t shining directly in through the window to get a better quality of light. It will be much softer, and any shadows will also be softer rather than hard with defined edges when using direct sunlight. A room with a window that faces north can be particularly good for recording videos. The North Window Light, or reflected light, will avoid those hard shadows and you won’t have to worry about the sun moving across the studio and constantly changing the direction of shadows.
So how do you use daylight?
If you are face on to the window the daylight will evening illuminate your face. Turn your body 45-degrees from the window and you will have some soft shadows on the parts of your face that point away from the window. Now turn a further 45-degrees, so you are side on to the window, and you will have a dramatic shadow on the parts of your face that point directly into the room. If you look at the photos and diagram below you will see what I mean.
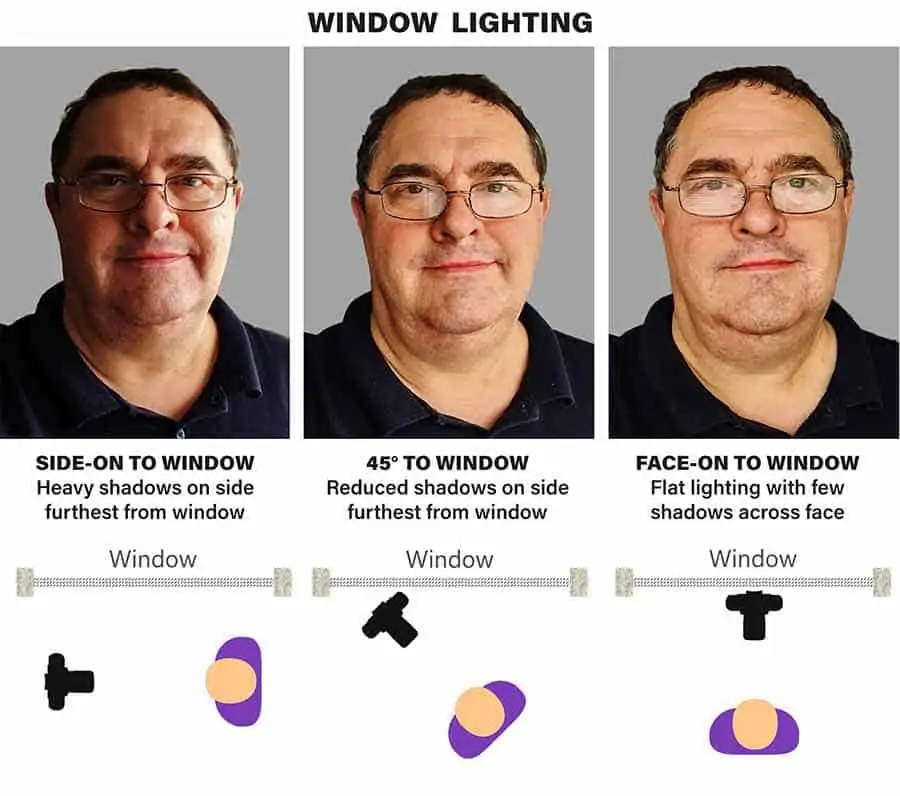
If you feel the shadow is too deep you can use a reflector to bounce some light into those shadows. The reflector can be held by an assistant, but if you’re working on your own use a light stand and clamp.
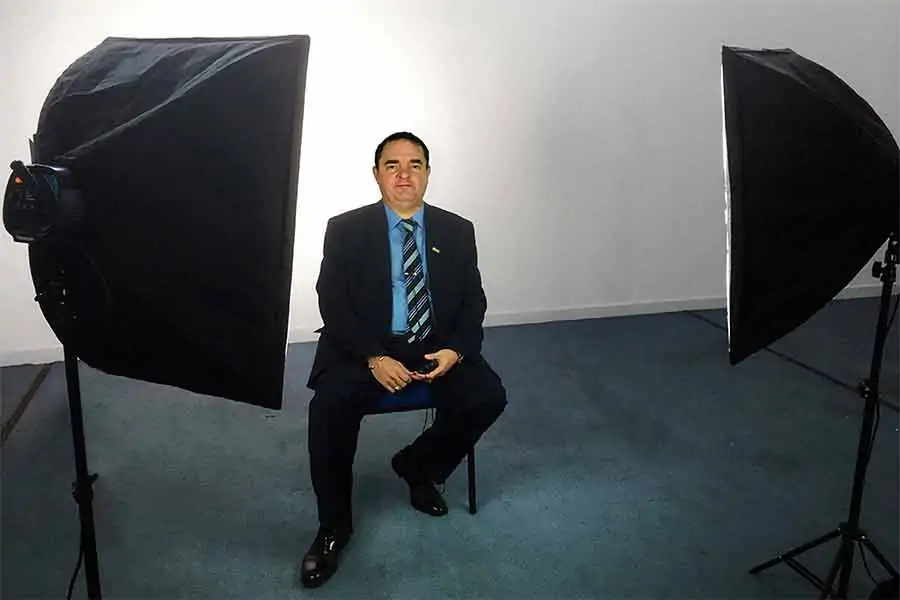
Softboxes and LED light panels
When I started using video lights, decent quality LED light panels were too expensive, so I opted for a pair of softboxes with CFL bulbs. The main reason I bought them was to have more control over my lighting. With artificial lights, you can shot videos whenever the mood takes you.
If you decide to go with softboxes for your lighting, consider getting the type that pop-open like umbrellas in literally seconds. You should also get bulbs that are daylight rated, so even if some daylight comes in through the window you won’t be mixing light of different color temperatures and getting nasty blue or orange color casts. Closing your curtains or blinds is another good tip. If you let daylight pour in through a window you can’t control the look of your video, which is one of the points of havings a studio. So close those curtains or blinds and just use your softboxes.
The reason the front of a softbox is square or rectangular is that you are trying to mimic what happens when you use a window and daylight. The whole front of the softbox becomes your light source, producing lovely soft light that helps to smooth out any shadows.
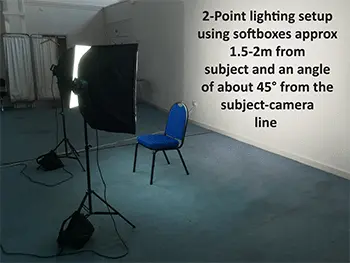
Place your Softboxes about 5 to 6 feet away from you and at an angle of about 30 to 45-degrees to the left and right of you. As the diagram shows, your camera will point at you through the gap between the two lights.
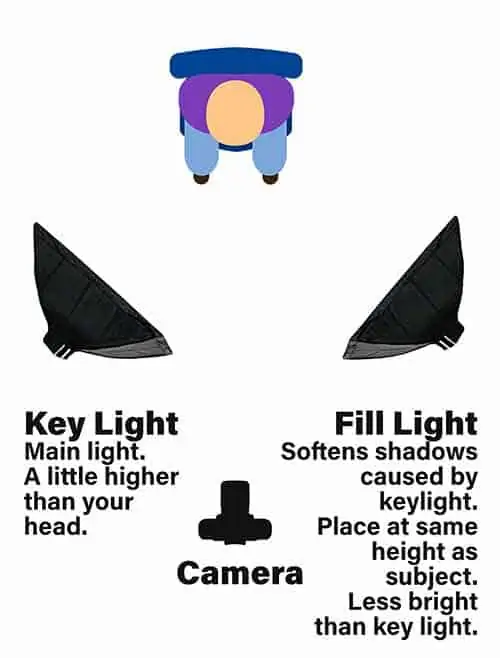
If you are after flat light across your face have everything symmetrical with the two lights. But if you want some shadow to help define your facial features use one as your main or key light and the other as a fill light. The fill light literally helps to fill some of the shadows caused by your key light. Set your key light a little higher than your head and angle it down at yourself by 30 – 45 degrees. Your fill light should be about the same height as your head and camera. Set the brightness of your fill light to be lower than that of your key light. The exact difference depends on your preferred look, but a good starting point is to have the fill brightness about one-half to one-quarter of the key light. If your softbox lights don’t have variable power levels you can move the fill light further away or remove some of the bulbs.
If you prefer using LED light panels the studio layout is the same as with the softboxes. The advantage of LED lights is that they are more efficient than CFLs, produce very little heat, and can take a little rougher handling than the glass CFL bulbs. But since I take my studio to my client’s premises, the biggest advantage of LED lights is that they are much quicker to set up than softboxes.
Assuming you have space, stand, or sit at least 6ft from your wall or backdrop. That way any shadows on the back wall should fall where they won’t be seen in the shot.
4. Use an HD Camera & Tripod
The next piece of studio equipment is your camera, and I would recommend using one that can shoot HD1080p. Forget about 4k cameras. Remember that most people are now watching YouTube videos on mobile devices so you’re wasting your time and money if you opt for 4k.
There are four types of cameras I would suggest: a webcam, smartphone, camcorder, and DSLR/Mirrorless camera. Each has its pros and cons, but if you are just starting out, I would recommend getting a good HD webcam. You can get one for under $50 and you will be in good company. Many vloggers and those running YouTube gaming channels use webcams.

However, if you already have a good smartphone or DSLR then go ahead and use that instead. It is more important that you publish more content than your equipment is the latest and best gear. The reality is that most cameras got rather good a few years ago, so it doesn’t matter whether you have a 10-year-old camcorder, an iPhone 6s, or a Canon EOS R. You’ll look good whichever one you use. Don’t forget, most people do not watch YouTube videos on a full-size screen and mobile internet connections frequently limit image quality.
Don’t let your footage be shaky, keep your camera steady
Just as important as a good HD camera is a way of keeping it steady. If you are not going to have an assistant controlling your camera you don’t need a tripod with a slick fluid head. An inexpensive Amazon Basics tripod will be good enough. If you are not going to be filming outside of your home video studio you could even mount a webcam or smartphone on top of a light stand, since the modern type has a 1/4-inch thread on top of the mounting spigot. Most cameras have a ¼-inch mounting hole, so attaching them to a tripod will be easy enough. But if you opt to shoot video with a smartphone, you’ll also need a smartphone tripod adapter.
Provided you intend to put your tripod or light stand on the floor something like an inexpensive tripod will do. But if you are going to be filming at a desk or table, you’ll need a smaller tripod that will let you have your camera lens at or slightly below eye level.
5. Recording good quality audio is essential, not optional
Although your video quality can be slightly sub-optimal, your sound cannot be. The sound quality of your videos must be good because it improves the viewer experience. Research shows that viewers will tolerate poor video quality, provided the sound is OK. However, they will click away if the sound is poor.
Your microphone choices
Using the built-in microphone on your camera should always be your last choice of microphone. Unless your subject is close to the camera, the sound quality will not be good enough. Always use an external mic and make sure it isn’t an external mic that you’ve mounted on your camera. The point is to get the microphone as close to your mouth.
The first microphone I would choose is a clip-on lavalier mic that attaches to your clothing. These are usually omnidirectional mics, and they can be quite inexpensive, although I would suggest spending at least $20 and $30 to get a decent quality one. The one I have been recommending for the last few years has been the Power DeWise lavalier microphone.
My next mic choice would be a short shotgun microphone. Normally these are sold as on-camera mic, but I would put it on a boom arm mic stand. Set it up so it is just above the top of the frame and pointing at the presenter’s mouth. The one I use is the Deity V-Mic D3.
A third option is a handheld microphone. If you have trouble with background noise, try using a highly directional handheld mic. This will help cut a lot of the background noise.
The last type of microphone I would choose is a large-diaphragm condenser mic. They tend to be large, and many vloggers don’t even bother trying to hide them out of view.
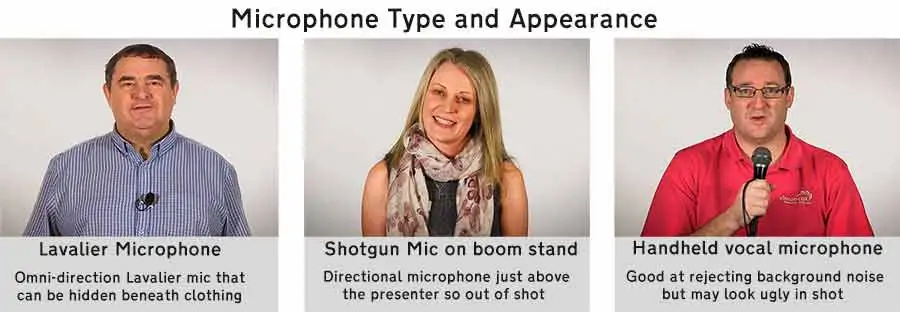
Whichever microphone you use you want to keep it close to your mouth; 6 to 12-inches normally produces good results.
Recording your sound
Ideally, your camera should have an audio-in socket so audio and video can be recorded together. Unfortunately, not all cameras have an audio-in socket. If this is the case with your camera you will need to record your audio to a separate device. Once you edit your video you will have to synchronize the audio and video together.
If you are recording with a webcam do not use the built-in microphone, it will sound rubbish. The easiest way to record with an external mic to your PC or laptop is to use a USB microphone, such as the extremely popular Blue Yeti.
Taking your studio on the road
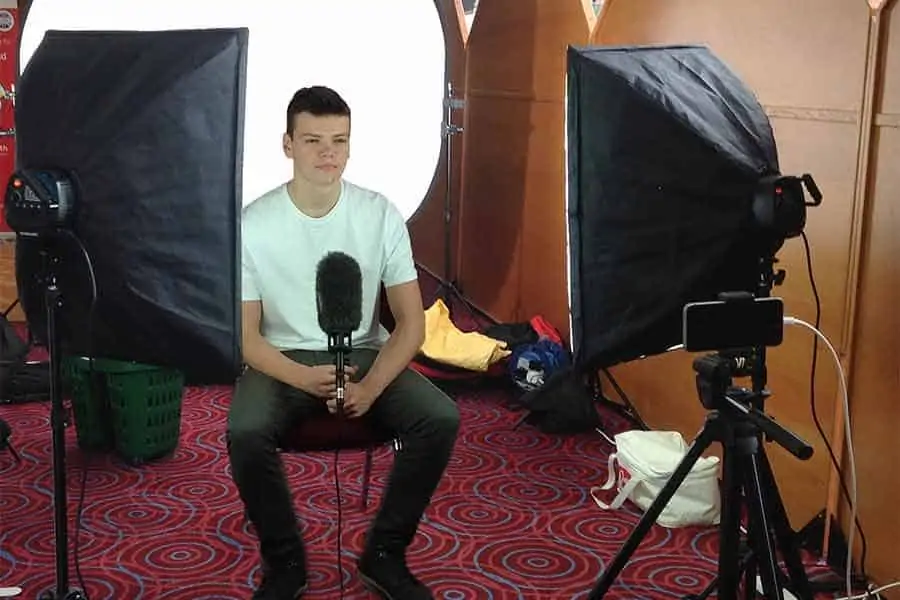
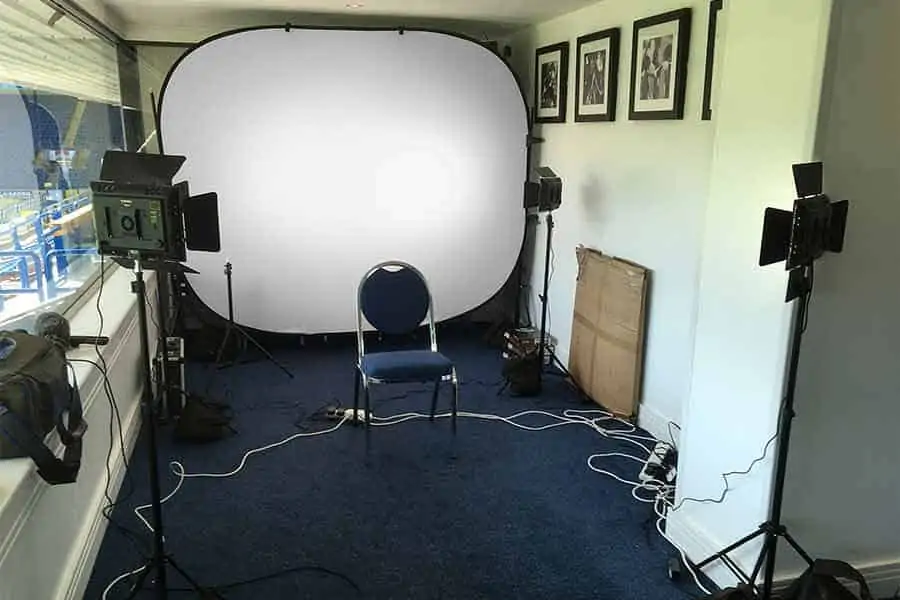
The DIY Video studio for YouTubers and Beginners can go on the road and be used almost anywhere, it’s not just something you can build in a spare bedroom or garage. You can see in the above image I’ve taken those same elements to a soccer stadium to record short videos with visitors to a business event. I was filming with an iPhone SE (essentially an iPhone 6s, as far as the video camera is concerned) and the presenter handheld the shotgun mic. The collapsible backdrop allowed me to hide the clutter behind the presenter. To make sure the backdrop appeared white instead of gray I added a pair of Yongnuo YN-600 video lights to light the backdrop.
Using the DIY Video Studio for YouTubers and Beginners plus two LED lights on the backdrop the background looks pure white. The result is that the viewer will not be distracted by anything else in the frame and you become the focus of the video. You can see the result below in a sample frame from one of my coaching videos below.

With this set up I have recorded videos and presented live streams at business events around the country. The result looks professional but is easy to accomplish.
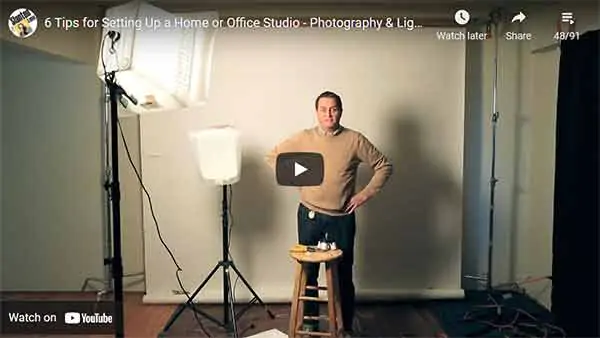
Tips for Setting Up a Home or Office Studio
In this video, The Slanted Lens channel, gives 6 tips on setting up a home or office studio in a spare bedroom.
DIY Video Studio FAQ
What do you need for a YouTube studio?
You will need…
A room with enough space for you and your equipment that’s also quiet.
A background, whether a plain wall or a backdrop.
Natural window light or two Softbox or LED panel lights.
A good HD camera that is mounted on a tripod.
An external microphone that can be placed 6-12-inches from your mount. For example, a lavalier or short shotgun mic.
How much is studio equipment?
The truth is that you can spend as much or as little as you want on your video gear. You could start by using the built-in webcam on your laptop or the smartphone you already have. However, good audio is a must so also get an external mic for between $20 and $100. If you are looking at mid-range gear, you could get a mirrorless camera, external short shotgun mic, a tripod, and softbox lights for under $1,000.
What lights do Youtubers use?
Neewer 18-inch LED ring light.
Neewer Bi-Color 660 LED Video Light with Softbox.
Linco 2000W 3-point Lighting Kit With 3 Color Muslin Backdrops.
Aputure Amaran AL-528S LED Video Light.
Do you need a microphone for YouTube?
If you are going to be serious about creating a successful YouTube channel, then YES you need a microphone, and it needs to be a good one. Fortunately, it does not have to cost the earth. A Power DeWise lavalier mic is about $22. A Deity V-Mic D3 short shotgun mic costs under $100. And the Blue Yeti condenser mic is also about $100. You can pay a lot more, but these microphones will allow you to record good audio for YouTube videos.