Author: Tosh Lubek Published: 13th April 2023
DIY Video Studio is supported by its readers who use the affiliate links or ads on this site. As an Amazon Associate, I earn from qualifying purchases. Thank your support if you use any of the links.
If you record music, voiceovers, or podcasts using the Focusrite Scarlett 2i2 audio interface you should know what the Focusrite Direct Monitor button does. I’ll explain what direct monitoring on the Focusrite interface is and answer the question of should Direct Monitor be on or off while you’re recording.
This article is based on my experience of radio production plus recording voiceovers and podcasts using the 3rd Gen Scarlett 2i2 with my Windows 11 PC running Adobe Audition. If you are recording with Audacity, a lot of what I have to say also applies.
So, let’s jump in and I’ll explain what Direct Monitor means and what happens when you press the Focusrite Direct Monitor button on a 2i2.
- Pro performance with great pre-amps – Achieve a brighter recording thanks to the high performing mic…
- Get the perfect guitar and vocal take with – With two high-headroom instrument inputs to plug in…
- Low-noise for crystal clear listening – 2 low-noise balanced outputs provide clean audio playback…
- Studio quality recording for your music & podcasts – Achieve pro sounding recordings with Scarlett…
Last update on 2025-04-18 / Affiliate links / Images from Amazon Product Advertising API
When you have finished reading this article you might like to watch the YouTube video
What is the Focusrite Direct Monitor Button and what does it do?
The Direct Monitor Button on the Focusrite 2i2 interface lets you toggle the routing of the audio input between three output settings, OFF, MONO, and STEREO. OFF only allows software input monitoring via the DAW, while MONO and STEREO allow you to hear the input directly from the Scarlett 2i2 preamps.
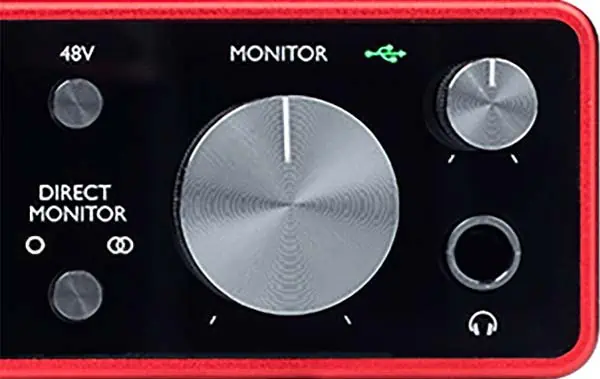
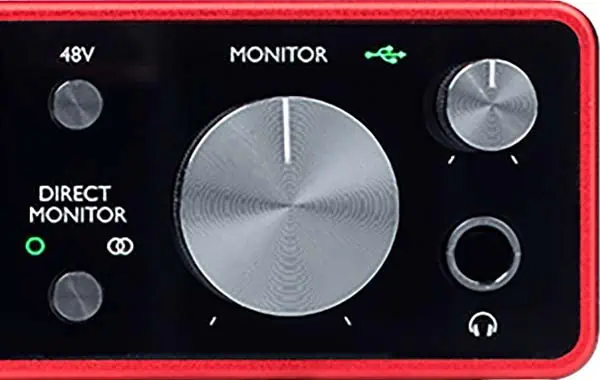
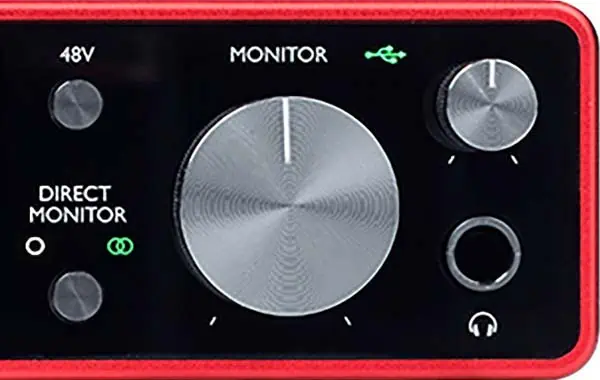
You can tell which setting has been selected by looking at the symbols above the Direct Monitor button. When one circle is illuminated, MONO direct monitoring is selected. If the two overlapping circles are illuminated, STEREO direct monitoring is selected. But if both symbols are unlit, direct monitoring is set to OFF.

When Direct Monitor is set to OFF, you will only be able to monitor the input audio in your headphones via the DAW on your computer, and you might hear a delay in the audio. The amount of delay depends on the latency setting in your DAW.
On my system, recording into Adobe Audition, I can get the latency down to 50ms without the audio crackling.
NOTE: If you do wish to monitor the signal through Adobe Audition software you must enable the small input monitor button (marked with an I) to the right of the record button (marked with an R) on the multitrack you are recording on.
It’s no surprise that there is a delay in the signal because the audio source is converted to a digital signal in the interface and sent to the computer via the USB cable. It’s then processed in the DAW before being sent back to the Focusrite interface via the USB cable, where it is converted back into an analog signal before being sent to your headphones.
When Direct Monitor is set to either MONO (the single circle) or STEREO (the two overlapping circles), your headphones will be monitoring the input audio directly from the Focusrite interface before it is converted to digital audio and sent to the computer. Because of this, the headphone monitoring will be latency-free, so you won’t hear a delay in the audio.
But what’s the difference between MONO and STEREO Direct Monitoring?

With Direct Monitor set to MONO, you will hear Inputs 1 and 2 as a mono signal in both the left and right ears. That applies whether you are using just one input or both inputs.

When you set Direct Monitor to STEREO, now in your headphones you will hear Input 1 just in your left ear and Input 2 only in your right ear. The two inputs are separated to left and right.
Direct Monitor Symbol Quick Guide
- Both symbols unlit: Direct Monitoring Off
- Single Circle Illuminated Green: Mono Direct Monitoring
- Overlapping Circles Illuminated Green: Stereo Direct Monitoring
To turn off direct monitoring keep pressing the Direct Monitor button until the single circle and two overlapping circles are unlit.
To turn on mono direct monitoring keep pressing the Direct Monitor button until the single circle illuminates green.
To turn on stereo direct monitoring keep pressing the Direct Monitor button until the two overlapping circles are illuminated green.
When should Direct Monitor be on or off
When you get a new piece of equipment that has many different settings it can be a struggle to know what to select. With Direct Monitoring, things are a little easier since you will most likely know whether you want to hear the sound source or not. The only fly in the ointment is that the Direct Monitoring setting affects your headphones and monitor speakers. That is one reason the Focusrite 2i2 front panel includes separate controls for the main monitor speakers and headphones.
Direct Monitor Off
I find there are far fewer times when I want direct monitoring to be set to Off than set to On, however, there is one important case when you should set it to Off.
If you are recording close to your computer and monitor speakers and need to have the speaker volume up, you should set Direct Monitor to Off. That’s where the single circle and two overlapping circles above the Direct Monitor button are both unlit.
Your inputs on the 2i2 will now not be sent to the main monitor output nor to your headphones. You will, however, hear the audio from any active or unmuted tracks that are already in your DAW.
The main positive here is that your input, perhaps your voice, will not be included in your speakers and therefore not be at risk of causing unwanted feedback.
You might also want to turn off direct monitoring if, for some reason, you do not wish to hear yourself while recording.
Direct Monitor On
There are more reasons why you would want to have Direct Monitor turned on, whether in Mono or Stereo. Here are some situations where direct monitoring is useful.
When recording a voiceover, you should have Direct Monitor set to MONO (single circle illuminated). Generally, we record voices in mono, so using the mono setting allows you to hear yourself equally in both ears. Using direct monitoring also ensures you do not hear yourself with a delay, which will make it difficult to speak normally.
If you are recording in a voice booth that is separate from your computer and studio monitor speakers you can usually leave the main monitor speaker volume turned up. But if you are recording beside your computer and speakers, remember to turn the large main monitor dial fully to the left (counterclockwise) to cut the audio volume.
Direct monitoring is also useful when you’re recording someone else, an instrument, or something else and you need to critically hear the audio source in or near real-time. This may include checking whether the source sounds the way you want it to sound or checking for imperfections, like clicks, buzzes, hums, etc. If you are using a single input, go ahead and use MONO, but with two inputs use STEREO (two overlapping circles illuminated).
An example of the latter situation might be a podcast recording. Here, STEREO is your best choice because you will hear Input 1 (you) on the left side of your headphones and Input 2 (your guest) on the right side. This will help you identify any issues in the audio quality, an example being background noise. In STEREO mode you will know whether it is coming from your end or your guests.
A situation where MONO direct monitoring would be useful would be when adding a vocal to a backing track on your DAW. In this case, you’ll hear yourself on both the left and right sides of your headphones. And as with recording a voiceover, whether you turn down your main monitors will depend on whether you are recording in an isolation booth or beside your computer.
NOTE: When either MONO or STEREO Direct Monitoring is used, the level of any computer audio, e.g., any active backing tracks in your DAW, will be lowered slightly to allow clearer monitoring of your audio inputs.
Controlling Main Monitor and Headphone levels on the Focusrite Scarlett 2i2
If you are to use direct monitoring effectively you must also know how to control the level, or volume, of your main monitors (speakers) and headphones. Both these functions are controlled by the dials toward the right side of the front panel. Here’s what they look like.

The large dial with the text “MONITOR” above it is the main monitor output level control. It sets the output level of the right and left ¼” main line outputs on the rear panel of the audio interface that connects to your monitor speakers. In other words, this dial controls the volume of your speakers.
This dial only affects the speaker output and not the headphone output.
NOTE: Turning the large Monitor dial fully to the left does not mute the output, although in most situations it does have this effect. However, if your input level is very high you might hear the audio on your speakers, even with the Monitor dial fully turned to the left.
The headphone level control dial is smaller than the main monitor dial and is situated in the top right corner of the front panel. It adjusts the output level of the stereo headphone output socket.
What to do if your microphone level is low
If you find that you’re having to crank the gain knob on your audio interface almost to the top to get a reasonable signal from your microphone, you could try doing what I do.
When using dynamic microphones, like the Shure SM58, Beyerdynamic M69 N(C), and the Fifine K688, that have low output signals, I use an inline mic preamp. The ones I favor to improve the signal-to-noise ratio for studio-quality audio are Triton Audio’s FetHead range, but I also like the Cloudlifter. The FetHead is ideal for ribbon and dynamic microphones, providing a clean boost of up to 27dB, while the FetHead Phantom, is designed to give condenser microphones a clean lift of 18dB.
The Cloudlifter provides 25dB of clean gain for low-output passive dynamic and ribbon microphones.
Any of these, help improve the sound quality when you’re using long cable runs, and noisy or low-gain preamps.
Last update on 2025-04-19 / Affiliate links / Images from Amazon Product Advertising API
Here’s a big ask from me: If you liked this article, please share it.
It will mean a great deal to me if you share this post because a few seconds of your time will seriously help my blog grow. The share buttons are below the “About Author” section.
Thanks. 🙂
Source: 1
About the author: Tosh Lubek is a multi-award-winning broadcaster, writer, and video producer, with 40 years of experience in professional broadcasting and has been using Canon video and stills cameras since 2010. He has worked with radio and TV broadcasters, advertising agencies, and direct clients on a variety of projects including radio and television advertising, online video production, corporate videos, award ceremony motion graphics, and theme park sound design. Tosh has won numerous awards, including a Radio Academy Awards Gold Sony, a Gold, Silver, and Bronze World Medals in the New York Festivals International Advertising Awards. Since about 2007 he has been creating YouTube videos. Tosh has been a sponsor of the “video booth” at HashTag Business Events across the UK.
Recent Posts
Recently, I shot several customer testimonial videos in 4K for a client when the overheating warning on my Canon EOS R6 appeared. In fact, it appeared three times in five sessions during the day of...
Why Every Photographer Should Have a Nifty-Fifty 50mm f/1.8 Lens
If there’s one lens nearly every photographer should own, it’s the 50mm f/1.8 - better known as the “nifty fifty.” This affordable lens provides impressive quality and versatility, making it...


